Using Workbench Classic for Remote Configuration
With GENESIS64, you can remotely configure your applications. AlarmWorX Multimedia is just one of the many applications that make use of this new feature.
Figure 1 - AlarmWorX Multimedia Provider in Workbench Classic
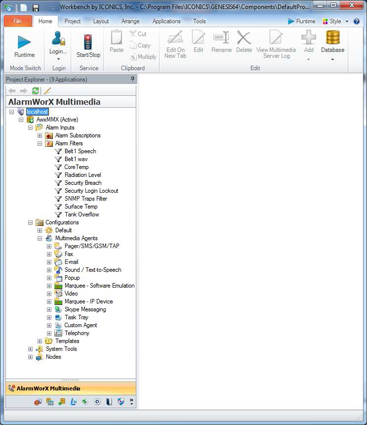
This topic guides you through the basic steps in adding the AlarmWorX Multimedia Provider, and configuring it using Workbench Classic64.
Adding the AlarmWorX Multimedia Provider
If you currently do not have the AlarmWorX Multimedia Provider in your Workbench Classic project, you can add it by:
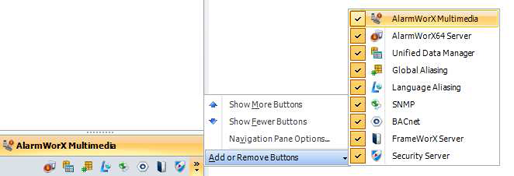
- On the Edit Toolbar, click the “Add/Remove providers” button. Put a check mark next to the AlarmWorX Multimedia item. (see Figure 2).
- You should now see the AlarmWorX Multimedia provider available in Workbench Classic.
Figure 2 – Adding the AlarmWorX Multimedia Provider
Configuring AlarmWorX Multimedia
Creating a New Configuration Database
Start with creating a new “empty” Configuration Database.
- With Workbench Classic64 Open, and the AlarmWorX Multimedia Provider, right-click on the Server name at the top of the tree, and select New Database.
- Select the SQL Server and Authentication you want to use and click on Next.
- Enter a name for your database and click on Finish.
- You should now see your new configuration database listed in the tree. Right click on it and select Make Active.
Adding an Alarm Subscription
Next, add an Alarm Subscription so AlarmWorX Multimedia can receive alarms.
- Expand Alarm Inputs -> Alarm Subscriptions.
- Right click on Alarm Subscriptions and select Alarm Subscription to add a new one.
- Enter a name for your Alarm Subscription and click the Add new Event Point button to subscribe to an OPC A/E server (by default there is subscription to your local AlarmWorX64 server).
- Once you have selected your OPC A/E server, click Apply to save your changes.
Adding an Alarm Filter
Now create an Alarm filter so an agent will be triggered only based on certain alarms.
- Expand Alarm Inputs -> Alarm Filters.
- Right click on Alarm Filters and select Alarm Filters to add a new one.
- Enter a name for your Alarm Filter and click the Edit Filter button to open the Filter Wizard, or manually enter a Filter String.
- Once you have designed your filter, click Apply to save your changes.
Adding a Media Template
Then create a Popup Media Template which will be used by or Popup Agent in the next section.
- Expand Configurations -> Templates.
- Right click on the Templates folder and select Templates.
- Enter a name for your Template and then select the Popup Window radio button for the Template Type.
- Enter some text or alarm specific information using the “…” button to launch the Template Definition Wizard.
Figure 3 - Template Definition Wizard
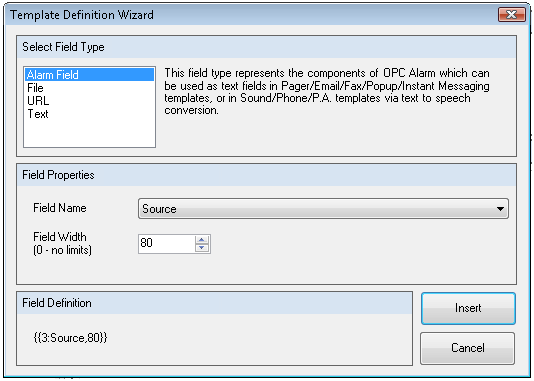
- When you have completed configuring your Template, click the Apply button to save your changes.
Adding a Multimedia Agent
Now create a Popup Media Agent which will then be used by our Action Set in the next section.
- Expand Configurations -> Multimedia Agents -> Popup.
- Right click on Popup and select Multimedia Agent Setting.
- Enter a name for your Media Item and optional description.
- From the Media Template dropdown, select the Template that was create in the previous step.
- Click the Apply button to save your changes. At this point you can also click the TEST button to get an idea of what our Popup Agent will look like.
Adding a Configuration
Next create a Configuration which will make use of our Alarm Subscription from earlier, and include our Action Sets from the following section.
- Right click on Configurations and select Configuration.
- Enter a Default for your Configuration.
NOTE: If you would like to use a name other than Default, you must link the node to this configuration in the Nodes section.
- From the Alarm & Event OPC Subscription to be used in this configuration dropdown, select the Alarm Subscription we created in a previous section.
- Click Apply to save your changes.
Adding an Action Set
Lastly, create an Action Set which will use the define when the previously configured items should execute including delays and looping.
- Expand Configurations, right-click the configuration created in the last step, and select Action Set.
- Enter a name for your Action Set.
- Make sure the Enabled check box has a check in it.
- Select your Alarm Filter from the Alarm Filter to use drop-down.
- Click the ellipsis button in the Action Destination column for the On Alarm Action Type. This will bring up the Choose Action Destination dialog. Select the Popup Agent that was created earlier and click Set selected item as Action Destination.
- You can also check the Ignore Schedule check box. Everything else can be left untouched for this example.
Figure 4 - Configured Action Set
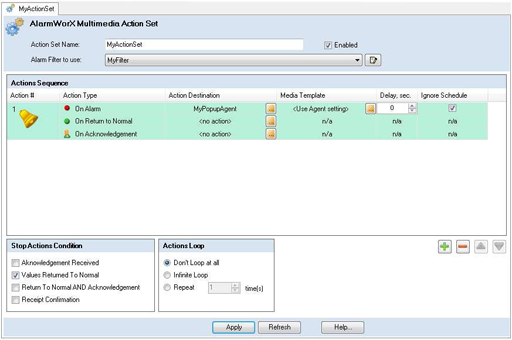
- Click the Apply button to save your changes.
Runtime
Before you enter runtime, make sure that UAC is turned off on your computer. Once you are sure UAC is off, click on the traffic light icon in the Workbench Classic ribbon to start the AlamrWorX64 Multimedia Server. When you trigger your alarm, you should see a Popup appear displaying information about the alarm.