![]()
![]()
The Hyper Alarm Logger logs alarms / events into separate storage files and maintains a persistent index of those files.
Each Logger object inside the Hyper Alarm Logger (see Logging) typically has a folder on the disk drive assigned, where it creates its own series of storage files. Once a storage file is created, it has a time range assigned that this file is responsible for, and this time range cannot be changed anymore. A new storage file only gets created when the Logger needs to log alarms / events that are outside the current storage file responsibility. Storage files are created with the file extension .almd, and are in fact SQLite files.
Next to the storage files, the Hyper Alarm Logger also maintains a persistent index of the storage files. There is one index file per Logger object, and it contains the definite list of storage files that the Hyper Alarm Logger operates with. It can be viewed and edited from Workbench.
The index files are physically located at “…ProgramData\ICONICS\HyperAlarmLogger” and their names consist of logger name and extension “almi”. Thus, when logger name is e.g., “Alarm Logger” then index file name is “Alarm Logger.almi”. Index files are also SQLite files.
The index of storage files (both archived storage files and live storage files) can be managed from Workbench under Product Configuration → Archiving Management. Here, it is possible to attach or detach files, as well as to change the Read-only and Archived flags on attached storage files.
Archiving Management
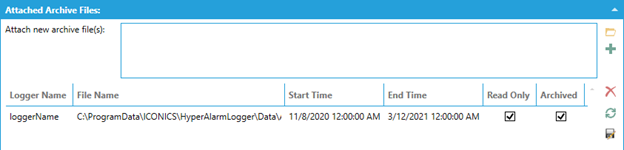
The meaning of individual columns in the table above is following:
Logger Name – the Logger name. This information is stored in the storage file itself and cannot be changed.
File Name – the full path to the storage file.
Start Time, End Time – the time range of alarms / events that the storage file is responsible for. This information is stored in the storage file and cannot be changed.
Read Only – whether the file is treated as read-only by the Hyper Alarm Logger.
Archived – if checked, then the automatic archiving functionality will not attempt to process this storage file. The configuration of the archiving functionality is documented in Archiving_Information_tab.
To add storage files to the index, simply browse for them using the folder icon, and then click the plus button. The files will be scanned and assigned to the proper Logger object and proper time range – this information is read from the storage file itself. Storage files are added as read-only and archived, but these flags can be changed subsequentially.
This feature can be used for example to re-add archived storage files that were removed from the index, or when reinstalling the product and the original storage file index is lost.