|
|
The features on this page require a GENESIS64 Advanced license and are not available with GENESIS64 Basic SCADA . |

![]()
|
|
The features on this page require a GENESIS64 Advanced license and are not available with GENESIS64 Basic SCADA . |
![]()
To configure an Energy AnalytiX application, there two basic areas of product configuration:
Energy AnalytiX Workbench Provider
AssetWorX Tree
This area relates to overall application configuration settings and it is the starting point for any energy application configuration. Although the product installation will install default, as well as sample, configuration data, it is always a good first step for the end user to start from this product configuration area.
Energy AnalytiX Workbench Provider
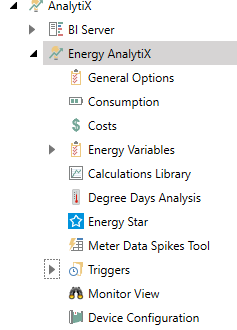
This area relates to enabling energy management to assets in the AssetWorX tree by adding an Energy AnalytiX extension. Energy AnalytiX supports the following types of extensions to an asset.
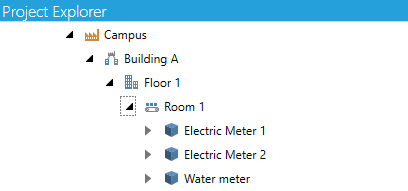
The AssetWorX asset tree is utilized to add Energy AnalytiX extensions to user configured assets (equipments). Using the Asset tree, Energy AnalytiX supports three types of Energy related assets.
Such as Building, room, manufacturing cell etc.
An energy asset aggregates and rollups consumption data from meters or other energy assets.
There are two types of regular energy assets:
Non-Rollup: Typically located right above energy meters and they calculate energy consumption using only energy meter consumption data.
Rollup: Typically, they are higher level assets and they are used to roll up (summarize) energy consumption using the energy consumption of their children assets (for example a building asset would rollup the consumption of all its floors and a floor would rollup the consumption of all its rooms).
Such as electric, water, gas, lighting etc meters.
Every energy meter is associated with a utility source and energy source type via meter types.
Energy AnalytiX Assets in Workbench

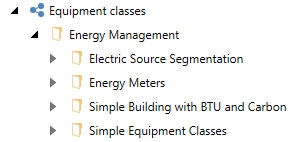
Note: Upon full Energy AnalytiX product installation, a folder with energy-related equipment classes will be created which can be referenced to get ideas and or suggestions about possible asset structure in terms of energy application.
An energy meter represents the entry point of energy data into Energy AnalytiX. It relates a utility or energy source to energy consumption, cost and carbon.
It is also the minimal configuration required to have energy data flows inside Energy AnalytiX. Also, an energy meter facilitates the analytics views on energy data (such as electric, water, gas) based on the energy meter’s meter type.
Energy Meters in Asset Tree
The user can associate the energy meter tags with important information regarding his energy application. In more details, an energy meter can have the following types of tags:
Consumption
Relates to energy consumption tags
Demand
Relates to demand related tags
Related
Relates to various meter characteristics such as voltage, current etc.
A meter can also have an optional rate tag to associate cost to energy consumption. In addition, energy meters can be utilized not only for energy source input but for other variables that require similar type of functionality such as occupancy, production count etc.
An energy asset represents the logical or physical entity for energy calculations allocation and propagation of energy data. It relates energy data to various levels of the asset tree, both physical as well as logical.
Energy assets operate on meter energy data, energy variables and built-in energy calculations. They are utilized for advanced energy analysis past the raw meter inputs. They can represent energy consumption at various levels of the asset tree and can be associated with both logical as well as physical locations or facilities.
Energy Assets in Asset Tree
Key differences between energy assets and meters
An energy meter represents physical characteristics of a measured quantity or energy source.
An energy meter cannot have energy calculations.
An energy asset represents various logical or physical units in your energy application.
An energy asset can have associated energy calculations.
The most basic (standard) energy calculations for an energy asset are based on meter consumption data.
The more advanced energy calculations (derived) for an energy asset are based on basic (standard) energy calculations as well as on energy variables.
Advanced energy scenarios such as energy segmentation, unit conversions or energy allocations require the configuration of energy assets.
Here are a few comments regarding the new Energy AnalytiX architecture and the integration with Asset AnalytiX.
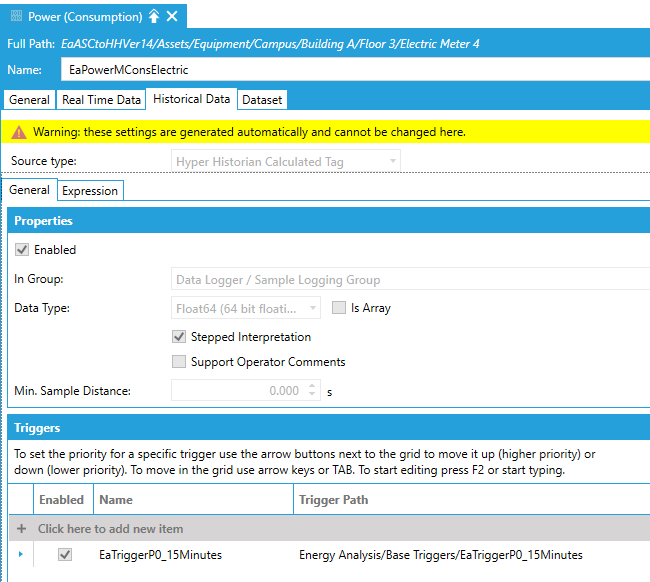
In the new architecture of Energy AnalytiX, any configuration element which requires data storage and data calculations will be processed by Hyper Historian. All related configurations in Energy AnalytiX Workbench forms will be auto-configured, transparent to the end user, as AssetWorX exposed equipment properties mapped to Hyper Historian tags or performance calculations.
Energy Meter Consumption Exposed as AssetWorX Equipment Property
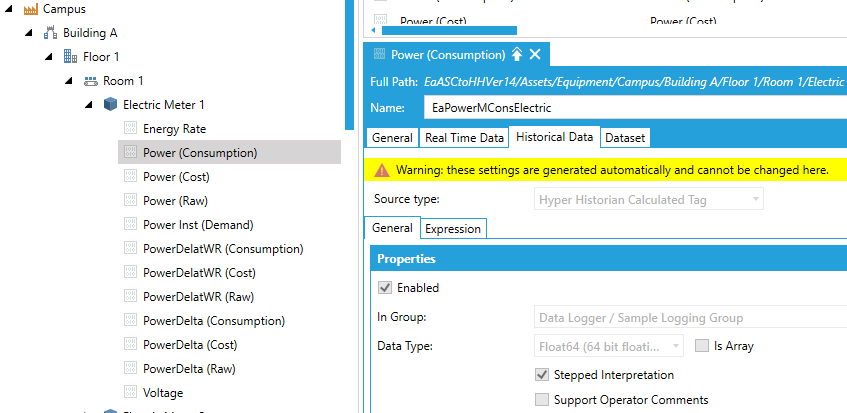
The end user can view in Workbench the underlying Hyper Historian settings for the related equipment property, however because the above settings are auto-configured, the end user will not be able to modify them. The underlying settings for Hyper Historian tags or calculations are based on the type of the related Energy AnalytiX configuration element, whether it is a simple raw tag for data collection and storage or it requires to be associated with a Hyper Historian performance calculation.
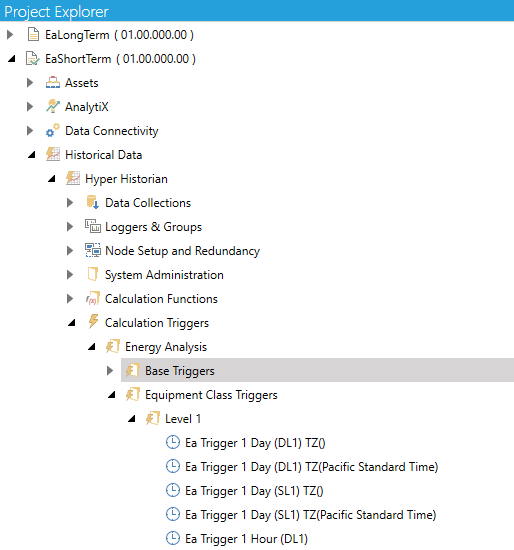
Hyper Historian performance calculations do require an associated Calculation Trigger. Energy AnalytiX also handles this aspect transparently to the end user by using an appropriate calculation trigger with the appropriate processing phase pending on the timing of the individual energy related performance calculations.
To accomplish this task, Energy AnalytiX product installation will install a good number of pre-defined calculation triggers for Hyper Historian. The end user should not delete or rename, edit the related Hyper Historian calculation triggers, calculation functions, AnalytiX-BI energy data model, Periodic Triggers (under Actions) since the energy data collection and related calculations may be prevented from operating properly.
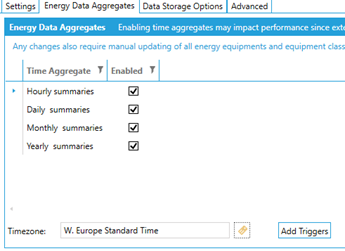
The calculation triggers are updated to include timezone information when daily, monthly and yearly data aggregates are enabled. The user should create first energy calculation triggers by using the General Options tab (Energy Data Aggregates) to pick a geographic location and to allocate related calculation triggers by clicking on the Add Triggers button.
Creating Timezone Aware Calculation Triggers from General Options
Predefined Calculation Triggers for Energy in Hyper Historian
In the new Energy AnalytiX architecture, all related energy data are exposed via AssetWorX or Hyper historian data access API and they are browsable via the ICONICS Unified Data Browser
Accessing Energy Data in Unified Tag Browser

As such, they can be natively accessed in any ICONICS client, such as TrendWorX64 Viewer.
Energy Data in TrendWorX64 Viewer

The typical recommended steps in adding energy extensions to assets in AssetWorX tree are:
Decide on an asset structure in terms of energy meter, energy asset (both non-rollup as well as rollup based).
Create the asset structure in AssetWorX without adding energy extensions.
Finally add Energy AnalytiX extensions to existing assets as needed.
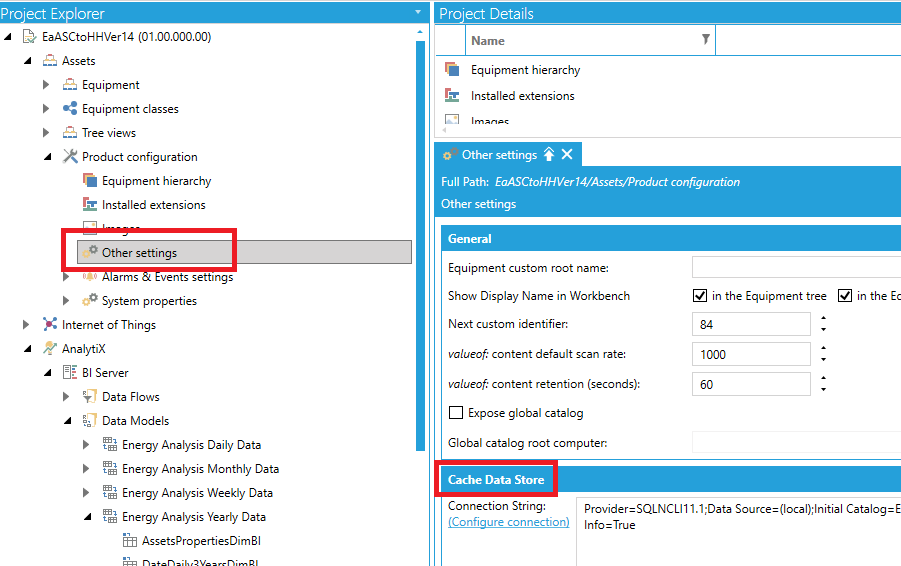
In certain configuration settings, constant values may be entered in configuring energy assets or meters. In these cases, the resulting AssetWorX equipment properties will need the AssetWorX Cache Data Store to be properly configured. If it is not, a warning will be displayed on the related Energy AnalytiX form.
Configuring AssetWorX Cache Data Store
In certain applications, Hyper Historian, which is the datastore and calculations backend of Energy AnalytiX may need to be located on a separate server from Energy AnalytiX. This scenario is supported since the new architecture of Energy AnalytiX requires that the AssetWorX, Asset AnalytiX, Hyper Historian and Energy AnalytiX configuration databases are located within the same AssetWorX configuration database.
While the shared Hyper Historian and AssetWorX configuration database smust be hosted on a single SQL server, the Hyper Historian service and AssetWorX service can run on different machines.
Configuring Remote Access to Hyper Historian in AssetWorX

If the field Extension server is filled for Hyper Historian, AssetWorX will use remote syntax to get Hyper Historian data (like \\HH_machine\hh:some_point) and vice versa.
Before you configure your meters, make sure you are familiar with the concepts described in the What is a Meter and How is it Used? topic. Also, make sure you weigh the options for:
Configuring meters individually, one a time, as described here in this topic.
Using an equipment class as a template for expediting meter configuration, as described in the Configuring Energy AnalytiX Using Equipment Classes to Add Meters to the Asset Tree topic. For example, you might create an equipment class for all meters; or you might create one equipment class for all electric meters and another for all gas meters, and so on. The equipment classes you create will depend on the number of meters and the types of meters you need to create.
Before you configure a meter, or any energy related asset you will need to have defined Hyper Historian logging groups and collectors to associate the meter tags. Energy AnalytiX will install a few sample logging groups in Hyper Historian, however you can create your own ones to related to desired data collection rates for energy meter data.
|
Note: Since you are defining one meter (and not an equipment class to be used as a template for creating meters more easily), it is easy to define just the information that you need to establish the meter in the asset tree. Establishing all data for the meter would be more important if you were creating an equipment class (template) for meters. If you would rather create an equipment class for meters, refer instead to Configuring Energy AnalytiX Using Equipment Classes. |
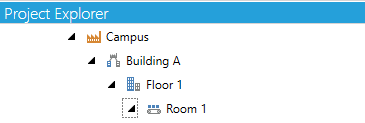
In the Workbench, expand your project and then the Assets node.
Expand the asset tree until you reach the node where you want to add the meter. Right-click the node and select Add Equipment from the pop-up menu. The New Equipment tab appears and a faded version of the new equipment appears in the asset tree.
Specify a Name for the meter. For example, East Northern Electric Meter. You can optionally enter either the same or different Display Name and a more-detailed Description of the meter.
On the Properties sub-tab, choose the Icon to appear in the asset tree for the meter. Note that while you can select the Equipment Class and the Level of the asset on this tier of the asset tree, they do not reflect the actual location of the meter in the asset tree. For more information about this tab, refer to the Properties Tab for Equipment topic.
If there is a report or other display you want to associate with the meter at runtime, you can configure it now on the Commands tab. At this point, since you are defining a lone meter, you can ignore the Commands tab and return to it later. Establishing this data would be more important if you were creating an equipment class (template) for meters and wanted the commands to be copied to each meter you created using the equipment class. For more about this tab, refer to the Commands Tab for Equipment topic.
Click Apply to save the new meter.
Click on the tab that has the plus sign (+) on it. From the Add New drop-down list, select Energy AnalytiX, as shown below. This adds the Energy AnalytiX tab.
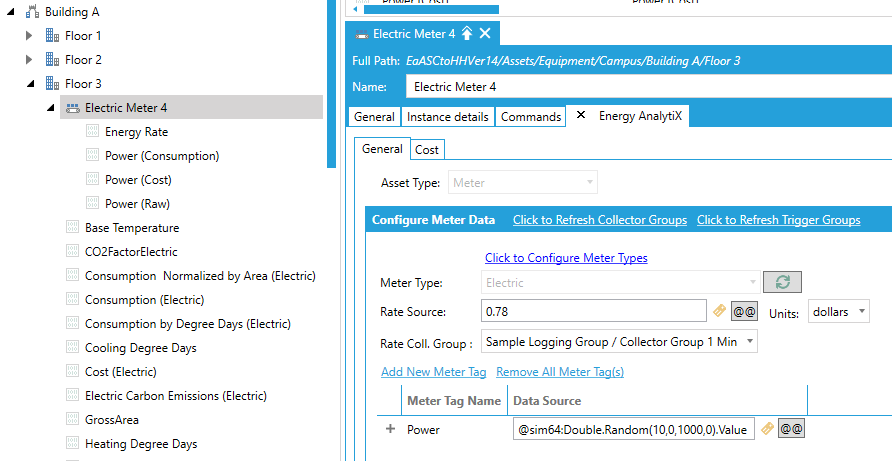
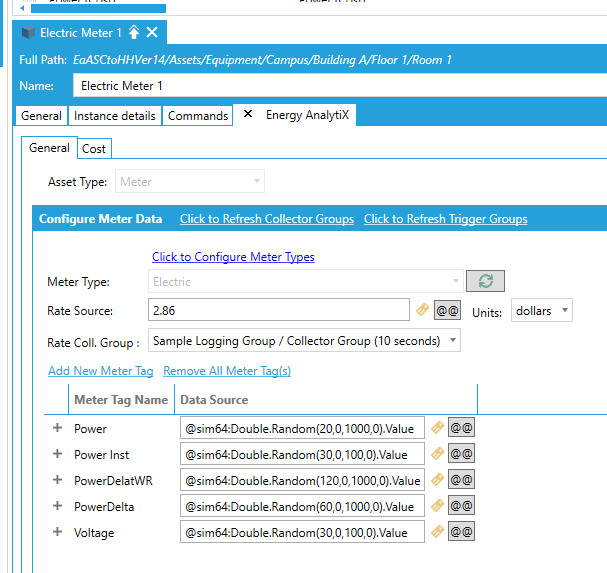
On the Energy AnalytiX tab's General sub-tab, from the Asset Type drop-down list select Meter. Notice that the button next to the Configure label now says Meter.
Click the Meter button. The Configure Meter Data dialog box appears. It looks something like the following:
Energy Meter Configuration Form

The following fields may be specified:
Required Meter Data:
Meter Type - Select the type of meter.
Rate Source - The energy cost rate (constant value or dynamic tag).
Rate Coll. Group - The Hyper Historian data collector group for the rate.
Meter Consumption Tags:
Add Tag - Add a new tag.
Remove Tag - Delete a tag.
Rename Tag - Rename a tag.
Tag Name - Select the desire tag name from the scroll-down menu.
Data Source - Select the ellipse to locate a data source.
Tag Collector Group- Select a Hyper Historian collector group for collecting data for this tag
Meter Tag Type – Select the function of the meter tag. A meter tag can be Consumption, Demand or Related (like Voltage, Power factor etc.). Configuration options will vary according to the selected meter tag type.
Value Type - Select the type of value for the meter tag (Total, Point, Delta, Delta with Rollover).
Rollover Value - Select the value at which the meter will rollover. This option is only applicable when Value Type is specified as Delta with Rollover.
Units - Specify the units for the meter.
Integration Type - Select when integration will take place (Seconds, Minutes, Hours, Days). This option is only applicable when Value Type is specified as Point.
Reset Threshold - Select that value at which the runtime will detect false meter reset scenario. If this meter counter value exceeds the value of the threshold, the runtime will assume a valid meter reset scenario occurred. This option is only applicable when Value Type is specified as Delta or Delta with Rollover.
Miscellaneous:
Manufacturer - Specify the manufacturer.
Serial Number - Specify the serial number.
Contact Info - Input contact information.
Location - Specify the meter location.
Meter Description - Input any additional meter information.
Click OK. This closes the Configure Meter Data dialog.
Go to the Energy AnalytiX tab's Cost sub-tab and select the Cost Center to be used for the meter's consumption. For more information, refer to the Specifying a Meter's Cost Center topic.
Click Apply to save the new meter. Notice that the Consumption and Carbon tabs disappear when you save the meter; these tabs are not used for meters.
·Click Apply when you are done.
Once all related energy meter configuration is completed and the user clicks on the Apply button all the configuration settings will be transparently auto-configured as asset equipment properties mapped to Hyper Historian raw tags or calculation functions. Because all the mapping of the energy configuration entities to the underlying platforms is transparent to the user, the user will not be allowed to manually edit the added asset equipment properties on behalf of Energy AnalytiX.
Energy Meter Configuration Exposed as AssetWorX Equipment Properties
In addition, all proper calculation triggers will be linked to the configuration entities with the proper processing phases to accommodate for the timings of the calculation executions.
Energy Meter Consumption Mapped to Hyper Historian Calculation
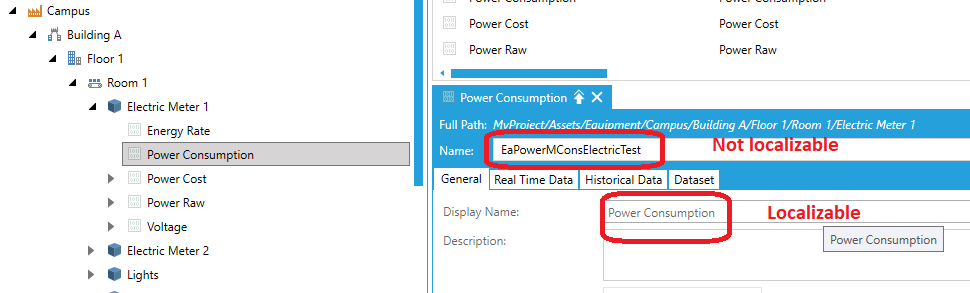
Energy AnalytiX in auto-configuring energy related entities will utilize a certain naming convention schema that will facilitate easy filtering on energy-related AssetWorX properties, along with the utilization of advanced array functions in Hyper Historian.
For energy meters, the related naming convention for asset equipment properties related to energy meters is as follows:
In general...
Equipment property naming convention is hardcoded and not localizable.
Equipment property display name is localizable.
Asset Equipment Property Naming
The naming conventions for energy meters are as follows:
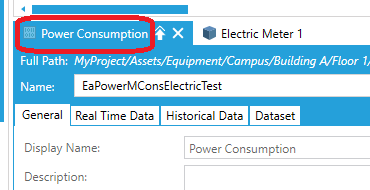
Consumption:
Ea + meter tag name (no spaces) + M + Cons + meter type name (no spaces)
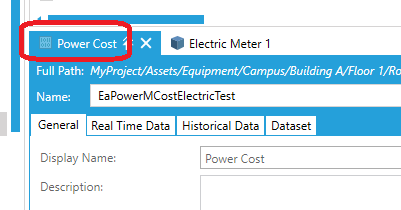
Cost
Ea + meter tag name (no spaces) + M + Cost + meter type name (no spaces)
Sample Energy Meter Configuration
Sample Naming Convention for Consumption (Consumption Tag)
Sample Naming Convention for Cost (Rate Tag)
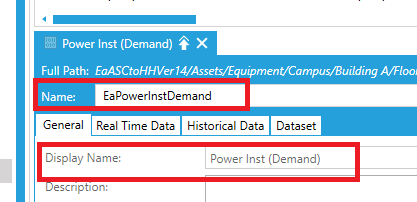
Sample Naming Convention for Demand Tag
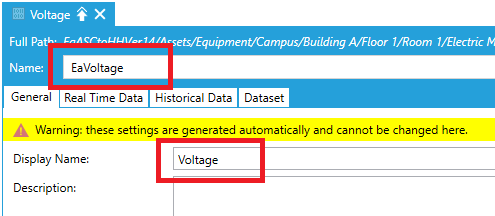
Sample Naming Convention for Voltage (Related Tag)
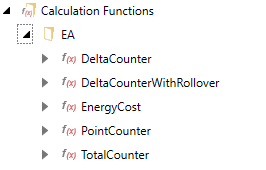
In Energy AnalytiX all related meter data are collected, data logged and processed by Hyper Historian. This is accomplished by a dedicated energy function library within Hyper Historian which is installed upon Energy AnalytiX product installation. The types of energy meter consumption tag counters are as follows:
Delta Counter With Rollover
Formerly known as Cumulative with Rollover counter
Delta Counter
Formerly known as Cumulative counter
Point Counter
Formerly known as Point counter
Total Counter
Formerly known as Differential counter
In addition, we also have the following energy related function:
Energy cost
Cost of energy given a rate value and a meter consumption tag
Energy Meter Related Functions in Hyper-Historian
In all cases, Energy AnalytiX provider in Workbench will allocate all necessary configuration entities and configure all required energy calculations function parameters.
Delta Counter with Rollover
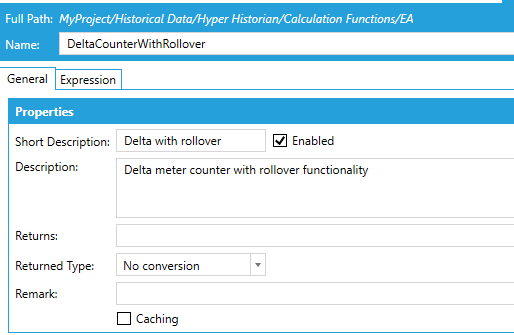
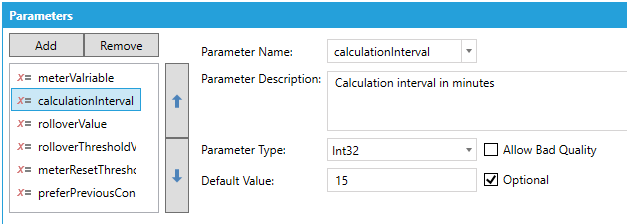
Delta Counter with Rollover Function Parameters
Description:
The Energy AnalytiX Workbench provider, when the user assigns a meter tag of the specific meter counter type, will:
Create a regular AssetWorX equipment property mapped to Hyper Historian regular tag with stepped interpolation.
It will add an AssetWorX calculated tag using DeltaCounterWithRollover calculation function mapped to a Hyper Historian calculated tag.
It will also assign a calculation trigger with interval equal to the base summary interval where the meterVariable will be the previously created Hyper Historian regular tag
An example will be: $EA.DeltaCounterWithRollover({{data:Signals.RampSlow}},1,100,60,8,true)
In all cases, the calculationInterval parameter should much the related calculated tag trigger period.
Implementation:
This function will implement the calculation logic as follows:
It will retrieve the two samples at the start and end of the interval defined by the calculation trigger and the calculationInterval parameter.
For example, for a 15-minute trigger and 15-minute calculation interval, a sample interval will be, for example, 10:00 and 10:15:00.
Note that the calculation interval should match the trigger interval.
If either of the boundary samples is bad quality or not retrieved the calculation result will be of bad quality.
Then, it will retrieve all raw samples between the start and end interval as defined by the calculation trigger and the calculationInterval parameter.
Next, it will filter only good quality samples and ignore any bad quality samples.
Finally, it will apply the delta with rollover calculation logic to every pair of values starting from the start interval sample.
Each pair of samples will be processed individually and in sequential order
For example, sample1 and sample2, sample2 and sample3, etc.
For each pair of consumption samples:
If sample2 (newer) value is greater than sample1 (older) value, then consumption for this pair will be sample2-sample1
If sample2 value is less than sample1 value, then more logic is applied
First, we will check for false rollover scenario which occurs when sample1 value is less that rollover*rolloverThreashold/100
Next, we will check for meter fluctuation scenario which occurs when absolute difference of (sample1-sample2) is less or equal to meterResetThreashold value
If either scenario is true, then the consumption for the specific pair will be the previous pair consumption, if preferPreviousConsumptionValue is set to true or 0.0 (zero) if the option is set to false
If both scenarios are false, then the consumption for the specific pair of samples will be sample2-sample1+rolloverValue
The final consumption value will be the sum of all individual consumption values from each consumption sample pair
Delta Counter
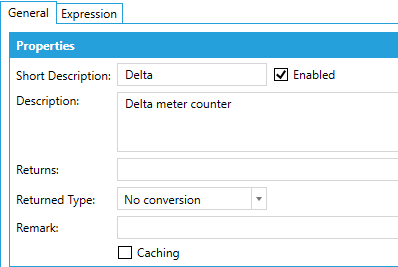
Delta Counter Function Parameters
Description:
The Energy AnalytiX Workbench provider when the user assigns a meter tag of the specific meter counter type will
Create a regular AssetWorX equipment property mapped to Hyper Historian regular tag with stepped interpolation.
It will add an AssetWorX calculated tag using DeltaCounter calculation function mapped to a Hyper Historian calculated tag.
·It will also assign a calculation trigger with interval equal to the base summary interval where the meterVariable will be the previously created Hyper Historian regular tag.
An example will be $EA.DeltaCounter({{data:Signals.RampSlow}},1,8,true).
In all cases, the calculationInterval parameter should much the related calculated tag trigger period.
Implementation:
This function will implement the calculation logic as follows:
It will retrieve the two samples at the start and end of the interval defined by the calculation trigger and the calculationInterval parameter.
For example, for a 15-minute trigger and 15-minute calculation interval, a sample interval will be for example 10:00 and 10:15:00.
Note that the calculation interval should match the trigger interval.
If either of the boundary samples is bad quality or not retrieved the calculation result will be of bad quality.
Then, it will retrieve all raw samples between the start and end interval as defined by the calculation trigger and the calculationInterval parameter.
Next, it will filter only good quality samples and ignore any bad quality samples
Finally, it will apply the delta calculation logic to every pair of values starting from the start interval sample.
Each pair of samples will be processed individually and in sequential order.
For example, sample1 and sample2, sample2 and sample3, etc ….
For each pair of samples:
If sample2 (newer) value is greater than sample1 (older) value, then consumption for this pair will be sample2-sample1.
If sample2 value is less than sample1 value, then more logic is applied:
We will check for meter fluctuation scenario which occurs when absolute difference of (sample1-sample2) is less or equal to meterResetThreashold valueIf true, then the consumption for the specific pair will be the previous pair consumption, if preferPreviousConsumptionValue is set to true or 0.0 (zero) if the option is set to false
If both scenarios are false, then the consumption for the specific pair of samples will be 0.0 (zero)
The final consumption value will be the sum of all individual consumption values from each sample pair.
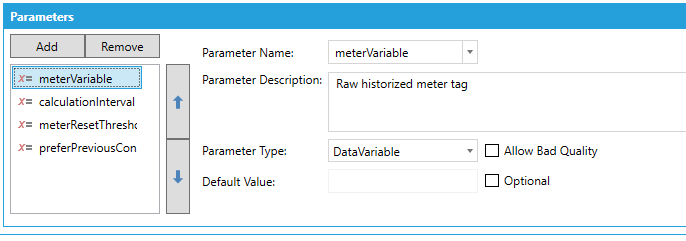
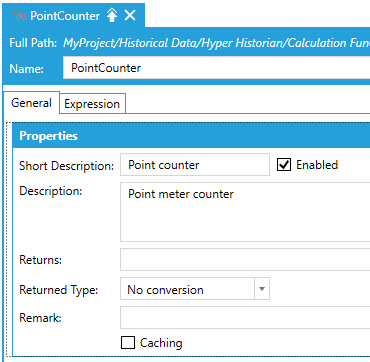
Point Counter
Point Counter Function Parameters
Description:
The Energy AnalytiX Workbench provider when the user assigns a meter tag of the specific meter counter type will
Create a regular AssetWorX equipment property mapped to a Hyper Historian regular tag with stepped interpolation
It will add an AssetWorX calculated tag using PointCounter calculation function mapped to a Hyper Historian calculated tag
It will also assign a calculation trigger with interval equal to the base summary interval where the meterVariable will be the previously created Hyper Historian regular tag
An example will be $EA.PointCounter({{data:Signals.RampSlow}},1,3600)
In all cases, the calculationInterval parameter should much the related calculated tag trigger period.
The integrationFactor allowed values are
o 1 for seconds
o 60 for minutes
o 3600 for hours
o 86400 for days
Implementation:
This function will implement the calculation logic as follows:
It will retrieve the two samples at the start and end of the interval defined by the calculation trigger and the calculationInterval parameter.
For example, for a 15-minute trigger and 15-minute calculation interval, a sample interval will be for example 10:00 and 10:15:00.
Note that the calculation interval should match the trigger interval.
If either of the boundary samples is bad quality or not retrieved the calculation result will be of bad quality.
Then, it will retrieve all raw samples between the start and end interval as defined by the calculation trigger and the calculationInterval parameter..
Next, it will filter only good quality samples and ignore any bad quality samples.
Finally, it will apply the point calculation logic to every pair of values starting from the start interval sample:
Each pair of samples will be processed individually and in sequential order.
For example, sample1 and sample2, sample2 and sample3, etc ….
For each pair of samples, the resulting consumption will be:
((Sample1+sample2) * (time difference in seconds of sample2-sample1)/2) * (1/integrationFactor).
The final consumption value will be the sum of all individual consumption values from each sample pair.
Note:
The Point counter is ideal for conversion of rates to totals such as kW to kWH or gallons per minute to gallons etc.
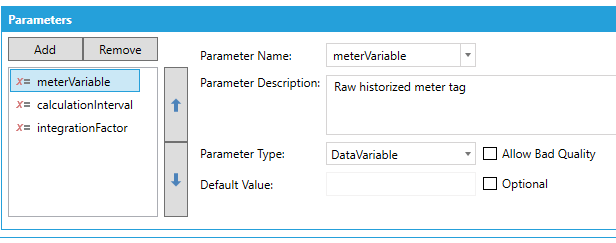
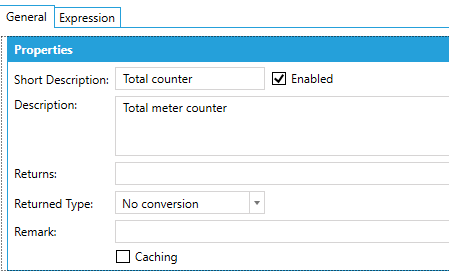
Total Counter
Total Counter Function Parameters
Description:
The Energy AnalytiX Workbench provider when the user assigns a meter tag of the specific meter counter type will:
Create a regular AssetWorX equipment property mapped to a Hyper Historian regular tag with stepped interpolation.
It will add an AssetWorX calculated tag using TotalCounter calculation function mapped to a Hyper Historian calculated tag.
It will also assign a calculation trigger with interval equal to the base summary interval where the meterVariable will be the previously created Hyper Historian regular tag.
An example will be $EA.TotalCounter({{data:Signals.RampSlow}},1).
In all cases, the calculationInterval parameter should much the related calculated tag trigger period.
Implementation:
This function will implement the calculation logic as follows:
It will retrieve all raw samples between the start and end interval as defined by the calculation trigger and the calculationInterval parameter.
For example, for a 15-minute trigger and 15-minute calculation interval, a sample interval will be for example 10:00 and 10:15:00.
Note that the calculation interval should match the trigger interval.
Next, it will filter only good quality samples and ignore any bad quality samples.
The final consumption value will be the sum of all individual sample values from each sample.
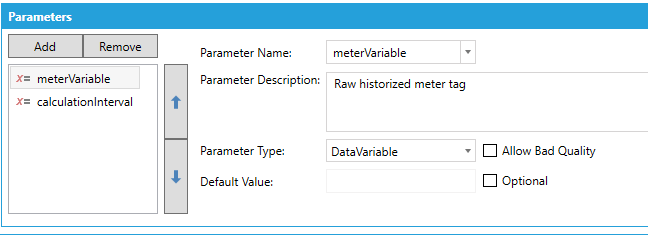
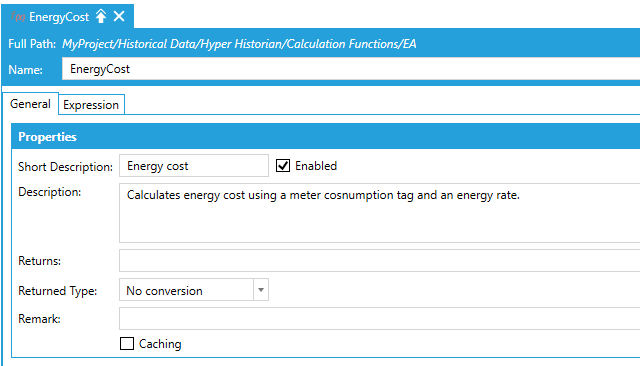
Energy Cost
If an energy meter has consumption tags and rate model values associated with it, then an energy cost calculation will be added. AS before, it will be an AssetWorX equipment property mapped to a Hyper Historian calculated tag and evaluated using a calculation trigger.
Energy Cost Calculation Function
Energy Cost Calculation Function Parameters

The energy cost calculation function will use as inputs the raw Hyper Historian historized tag for rate values and the calculated tag for energy consumption.
Description:
This function will implement he energy cost calculation function as follows:
It will take as first input the raw energy rate historized tag.
It will take as second input the related energy consumption calculated tag.
It will multiply their values (if good quality) and it will output the product as energy cost.
Implementation:
It will retrieve the most recent values for the above inputs.
It will multiply them (if good quality) and it will output the product as energy cost.
It will be triggered on a calculation trigger with a processing phase of 1, compared to the energy consumption calculated tag which will be triggered on a similar trigger but with processing phase of 0.
See Also: