![]()
![]()
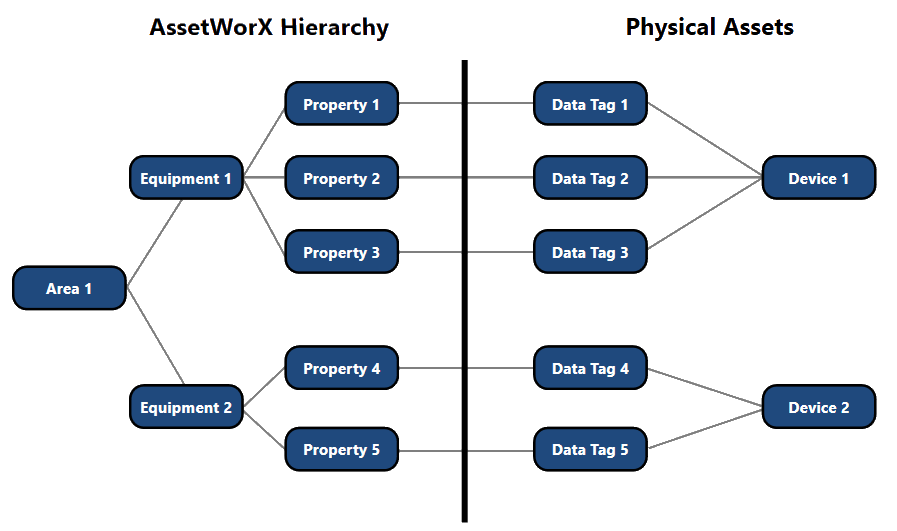
AssetWorX is a digital hierarchy of the assets in your enterprise. The hierarchy provides the user a method to organize the information coming from their equipment.
You construct the hierarchy by creating AssetWorX equipment. Equipment can be a physical device such as a pump or a conceptual space such as a floor. Refer to the following image for an illustration of how the AssetWorX hierarchy mirrors the physical asset space.
AssetWorX Equipment Hierarchy

For each piece of equipment, you define equipment properties. Equipment properties can be real-time data we monitor from our equipment, e.g. temperature or pressure, or metadata fields, e.g. area served or part number.
We organize our equipment and equipment properties, so they mirror the data organization of our assets. The following image illustrates how equipment properties align with the metrics of our assets.
AssetWorX Data Organization
In addition to the organizational advantages of AssetWorX, it provides the following benefits as well.
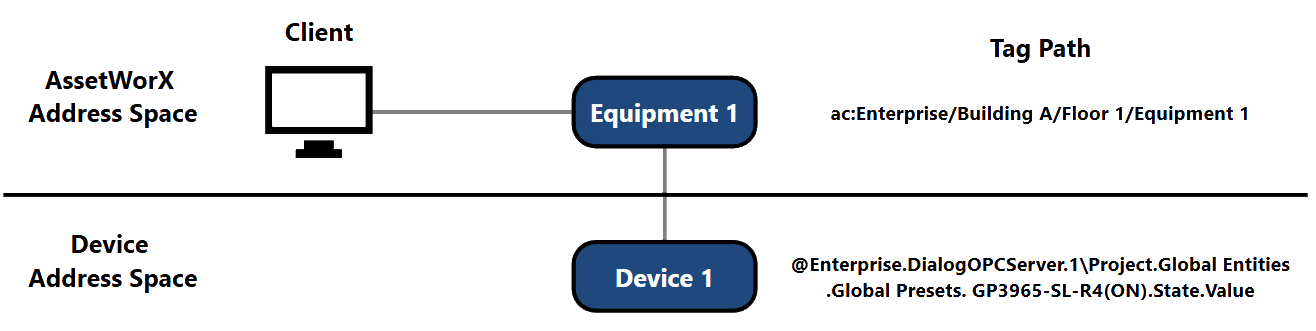
Data Normalization – AssetWorX provides a centralized server to request data from our devices. Instead of clients requesting information for multiple data sources, clients request information from AssetWorX. AssetWorX communicates with the individual data sources, reducing the load on any one data source because the data source has a single client.
The normalization also simplifies the client’s request for information. Instead of subscribing to a complicated tag syntax, the client subscribes to the refined AssetWorX path. The following image is an example of how AssetWorX replaces a direct connection to an OPC server.
AssetWorX Data Normalization – OPC Server Example
Distributed Architecture – You can connect multiple instances of AssetWorX to create a centralized monitoring system. The centralized monitoring system concatenates the asset hierarchies from disparate nodes into one unified hierarchy. An example of the unified hierarchy is in the following image.
AssetWorX Distributed Architecture
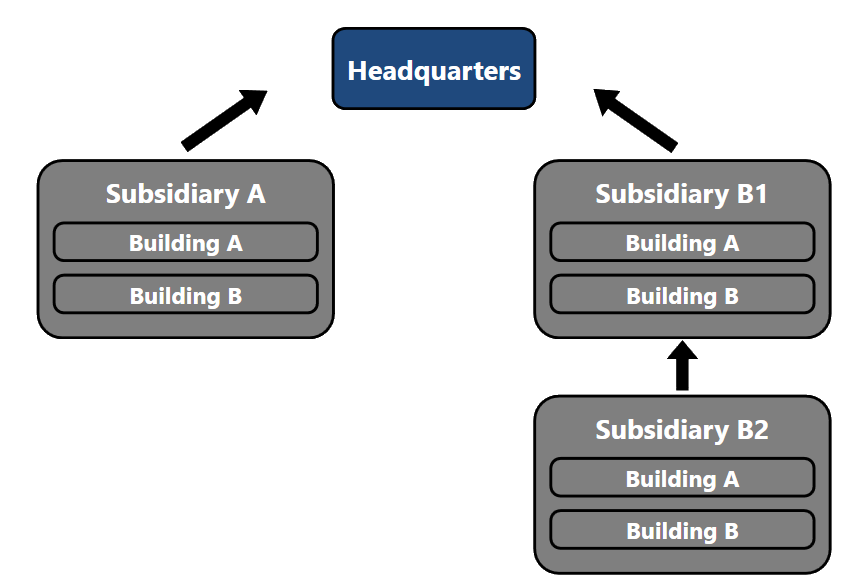
In the example, the asset structure from Subsidiary A, Subsidiary B1, and Subsidiary B2 would be available on the Headquarters AssetWorX node.
For more information on how to configure a distributed architecture, see the application note entitled AssetWorX – Scalable Distributed S95 Asset Architecture.
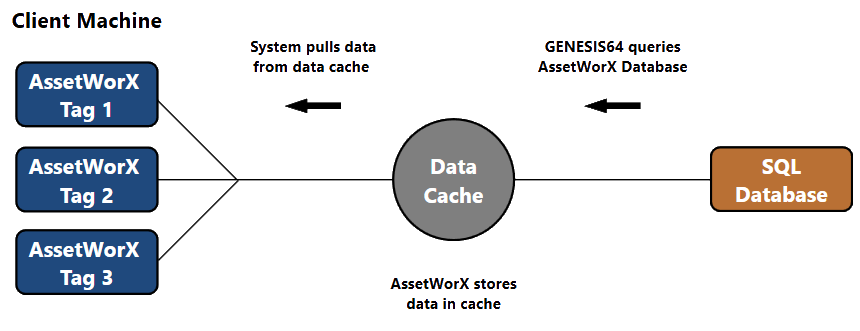
Data Caching – AssetWorX can cache values from data sources, providing faster updates for new clients. Updates from the data source will be stored in the AssetWorX database. When a new client connects to an asset, AssetWorX will look for data both in the database and from the data source and the first available update will be sent to the client. The following image is a schematic of how the data cache provides information to the clients.
AssetWorX Data Cache Schematic
Caching settings can be configured in Workbench’s AssetWorX provider under Assets > Product Configuration > Other Settings. Look for the section Cache Data Store.
Equipment classes are templates for assets. You can optionally create an equipment class for a “type” of asset, and then easily create assets from that equipment class.
Equipment classes use aliases that leverage bulk configuration tools to reduce the engineering time to create an asset hierarchy. The following image is an illustration of how a user can define an equipment class.
Equipment Class Definition
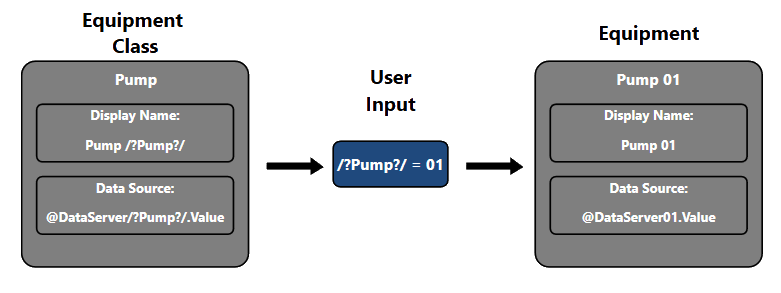
The example uses the ‘Pump’ equipment class to instantiate pump assets. The equipment class has a ‘Pump’ parameter that the user defines when creating the assets.
Go to Start > ICONICS Product Suite > Workbench to open the Workbench.
In the Project Explorer, expand Assets > Equipment classes.
Right-click on Equipment classes and select “Add Equipment class”.
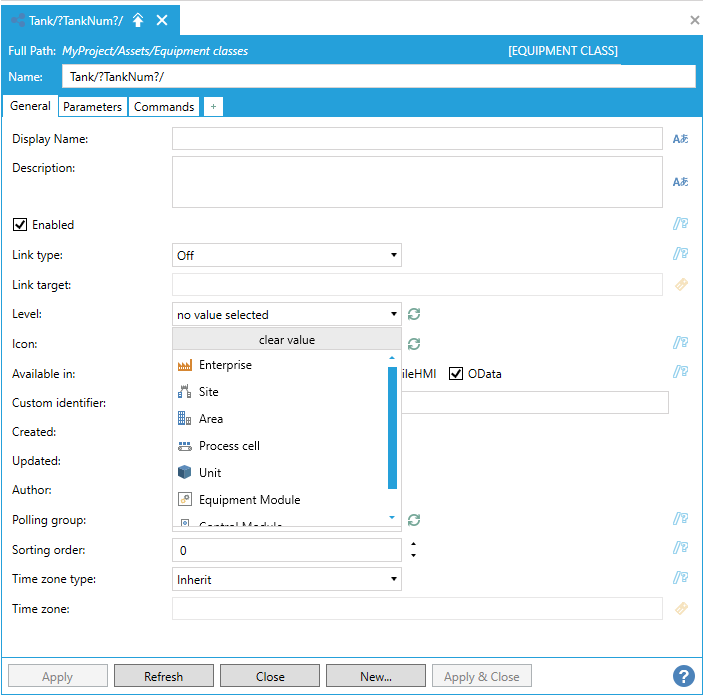
Name the new Equipment class “Tank/?TankNum?/”, without double quotes, as shown in the image below.
Tank Equipment Class

NOTE: The /? and ?/ symbols designate an alias within this equipment class. When you instantiate (create an instance of) this class later you will be given the opportunity to replace this alias with another value.
Set the “Level” field to “no value selected” by hitting the drop down and selecting “clear value”. See the image below.
Level Drop Down
On the Parameters tab, click Detect. This should find the TankNum Parameter.
Click Apply.
Right-click on the newly created Equipment class and choose “Add Equipment class property”.
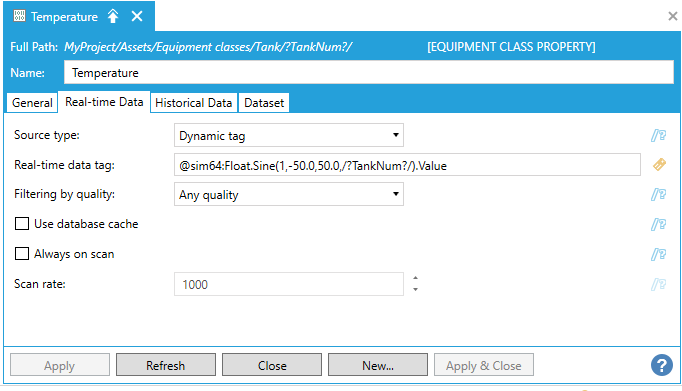
Name the new Equipment class property “Temperature”.
Select the Real-time Data tab. Hit the Source Type drop-down and select Dynamic Tag.
Select the tag symbol to open the Data Browser.
Browse to My Computer > Data Connectivity > OPC Data Access > Simulations > Float > Sine > FastL000. Click OK.
Replace the last 0 in the tag with /?TankNum?/. The final tag name should look like the following image.
Temperature Equipment Property
Click Apply.
Right-click on your Equipment class and choose “Add Equipment class property” again.
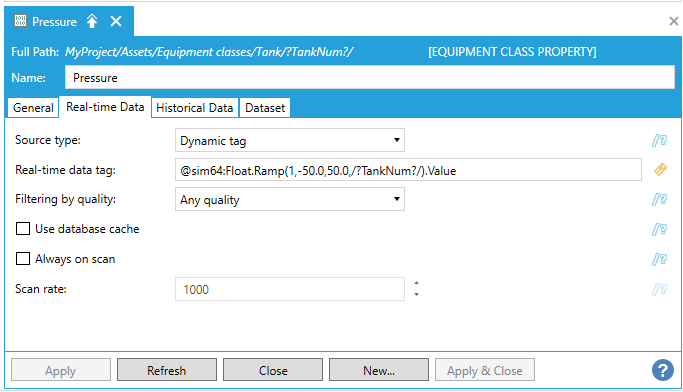
Name the new Equipment class property “Pressure”.
Select the Real-time Data tab. Hit the Source Type drop-down and select Dynamic Tag.
Select the tag symbol to open the Data Browser.
Browse to My Computer > Data Connectivity > OPC Data Access > Simulations > Float > Ramp > FastL000. Click OK.
Replace the last 0 in the tag with /?TankNum?/. The final tag name should look like the following image.
Pressure Equipment Class Property
Click Apply.
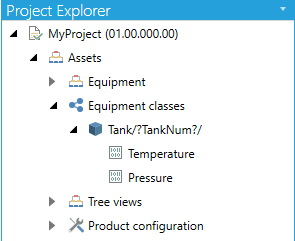
You have now created a simple Tank class with two properties, which can be used to create multiple Tank assets. Your equipment class node should look like the image below.
Equipment Class Node
In the Project Explorer, expand Assets and right-click Equipment. Select “Add Equipment from library…” to open the Equipment Class Library dialog.
NOTE: If you did not set the “Level” field to “no value selected”, your equipment class will NOT appear in the dialog.
Select your Tank/?TankNum?/ equipment class. Click OK.
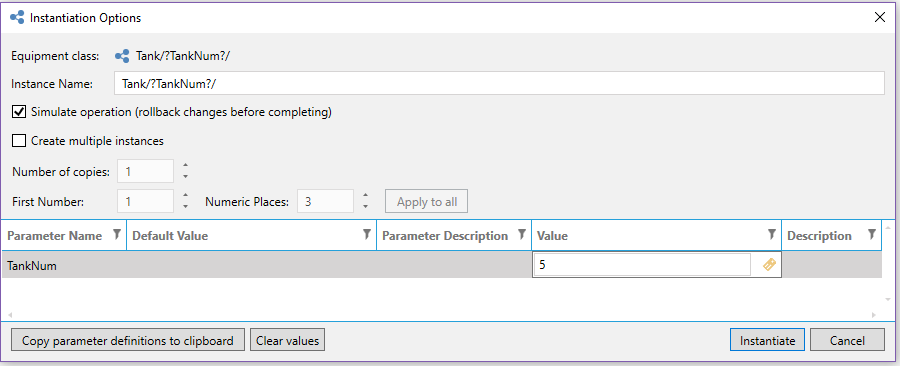
Uncheck the “Simulate operation” checkbox.
In the “Value” column of the Instantiation Options window, type “5”. See the following image.
Tank Instantiation Dialog
Click Instantiate. When the batch operation has ended, click Close.
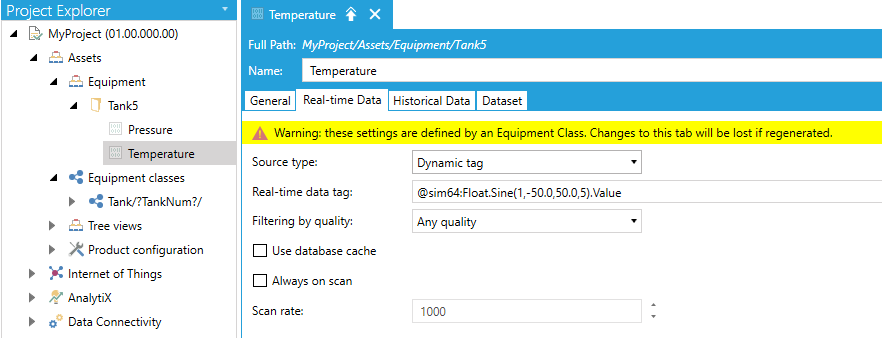
Browse the Equipment folder and select the new Tank5 item.
Note that the Temperature and Pressure properties exist in the new asset and they include the number 5 where /?TankNum?/ was in the equipment class property.
Temperature Property of Tank5
Follow steps 1 through 5 in this section again to create a “Tank10” asset. Refer to the following image.
Pressure Property of Tank10

Asset properties can be viewed in GraphWorX64 or other OPC-DA or OPC-UA clients. Browsing for asset properties instead of for the direct data source gives you all the benefits of AssetWorX plus it gives you a central location to edit your tags if you need to change them later.
NOTE: If you are browsing from a third party OPC client you will want to look for the “Assets” folder of the FrameWorX OPC server (ICONICS.FwxServerOPC).
Go to Start > ICONICS Product Suite > GraphWorX64 to open GraphWorX64.
In the Data Browser, drill down to My Computer > Assets > Tank5 > Pressure.
Left-click the property and drag it onto the canvas to create a process point.
Put the display into runtime. You should see your simulated pressure value. Refer to the following image.
Asset Property in GraphWorX64

When using the Asset Navigator control in GraphWorX64, you can right-click on assets to execute specific commands. This can be used to quickly open pages based on a specific asset, change the context of an existing page, and many other things.
To configure a command, select an asset in Workbench and go to the Commands tab.
For more information on how to configure and use Commands, see the application notes entitled GENESIS64 - Commanding Introduction and GENESIS64 – Commanding Configuration and Runtime.
You can control which assets your users have permission to view and control using the Security provider in Workbench.
Users and groups can define a Root Asset and Default Asset. The Root Asset will be shown at the root of the Asset Navigator, and the Default Asset will be expanded in the Asset Navigator by default. These settings can be used to customize how the Asset Navigator looks for different users.
Users and groups also have a tab called Assets. This tab can allow or deny access to particular assets. Security can control whether users can visualize assets and execute commands on assets. To prevent users from the “ac:” tags in GraphWorX64 and other GENESIS64 clients, you can uncheck the “Visualize” box on the Assets tab. This is similar to the “Read” checkbox on the Points tab, which is used for other (non-AssetWorX) tags.
For more information about the Security server and securing assets, see the application notes entitled GENESIS64 Security - Quick Start and AssetWorX – Security.
AssetWorX provides a hierarchal structure for asset management. The equipment we create in AssetWorX is a digital representation of a real asset. We use equipment properties to connect to device outputs. Assets are configured in Workbench. We use tools like equipment classes to reduce the engineering time required to create an asset hierarchy.
See Also:
Architectural Overview of AssetWorX