|
|
The features on this page require an add-on to work with GENESIS64 Basic SCADA. |

![]()
|
|
The features on this page require an add-on to work with GENESIS64 Basic SCADA. |
![]()
This application note provides a guide on how to create and use a Schedule Control in GraphWorX64 and WebHMI. It also demonstrates how to monitor and update existing schedules. A Schedule Control can also be used to override currently running schedules, though the control does not allow adding or deleting schedules. ScheduleWorX64 schedules can be created, deleted, and maintained in the Workbench. Click here to find out more about ScheduleWorX64, in general.
The Schedule Control can be added to a GraphWorX64 display as following:
Open up GraphWorX64.
In GraphWorX64, click on the Controls tab in the ribbon, and select Schedule Control.
Drop it on the canvas. You can resize it to a suitable size.
Schedule Control in GraphWorX64
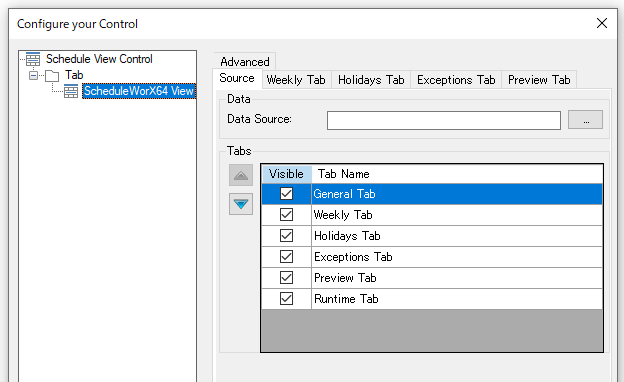
Click on the Schedule Control. You will see a new tab appears on the ribbon which is called Schedule Control Configuration. Click Configure to bring up the configuration dialog box
Schedule Control Ribbon
Click ScheduleWorX64 View to show its properties on the right side. By default, the Schedule Control will show six tabs during Runtime. You can toggle these by checking items under the Visible column.
Schedule Control Design Mode
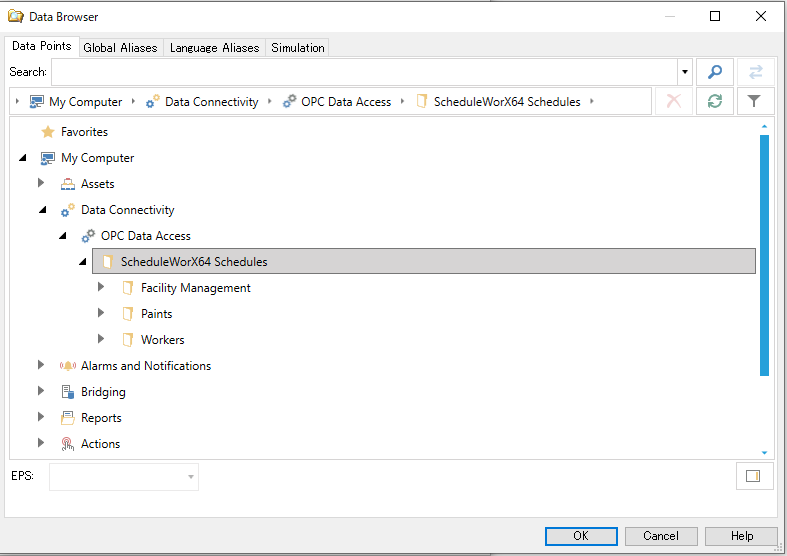
The Source Tab allows you to connect to a Schedule Data Source. Click on the … button next to Data Source and it will show a Data Browser. Select a schedule to show in the Schedule Control. Browse to My Computer > Data Connectivity > OPC Data Access > ScheduleWorX64 Schedules > … for sample schedules.
Data Browser Schedules
After configuring basic properties of Schedule Control, you can go into runtime. Once in runtime, it will allow you to View and update the selected schedule on the GraphWorX64 display.
During runtime you can apply any changes by clicking on the Apply Schedule button on the runtime ribbon.
NOTE: Right click in the header region and you can refresh the schedule, apply changes, connect to a different configuration (i.e. a different schedule), save configuration, or show the toolbar.
Schedule Control Runtime Ribbon

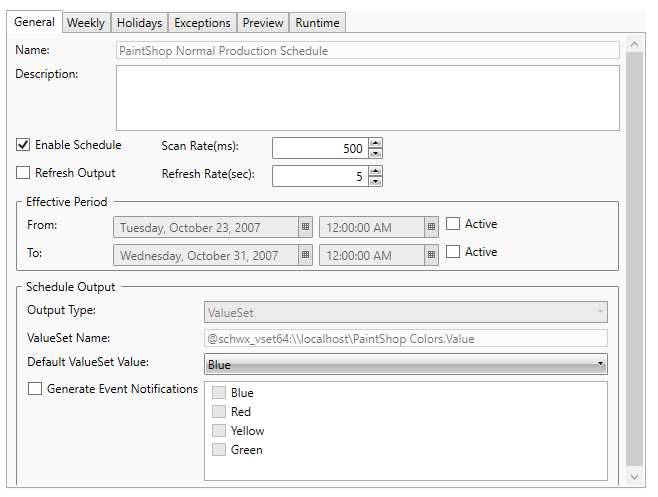
On this tab you can view general properties and perform the following actions:
The Enable Schedule checkbox gives you the option to Activate/Deactivate a schedule.
You can change the Scan Rate (default is 500 ms). Scan rate is the rate at which the data sources are retrieved and refreshed for schedule changes.
Select the Effective Period that you prefer. By default, it will be running forever unless you deactivate the schedule. If you want the schedule to start at a specific date or to end at a specific date (or to run in between those dates), you can set it up in this box.
You can set the Default ValueSet Value from the drop-down list; if there is no specific event described in your schedules, this will be the value given.
General Properties
On the Weekly tab you can insert events by double-clicking on the timeslot you want and then filling in the details. You can also right-click on the desired timeslot to select the time span that you want and also add a new event. Note that every event that is inserted in the Weekly tab will repeat automatically every week. You can also select the start/end time of the event from this popup.
Add/Update Schedules on Weekly Tab
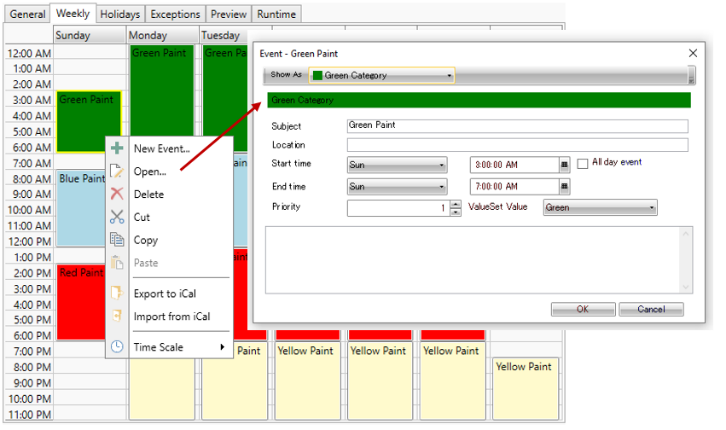
Event priority can also be used to set different importance to events. For example: if on Sunday at 3 – 7AM there are two weekly events, the one with higher priority will take precedence over the lower priority.
After adding all of the required information, you can click Apply Schedule and your schedule is set to run.
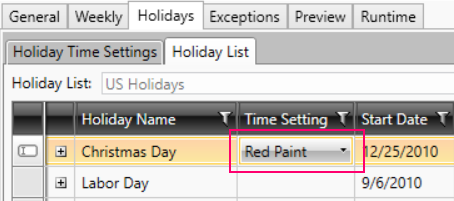
Click on the Holidays tab in your Schedule control to determine what to do on each holiday date.
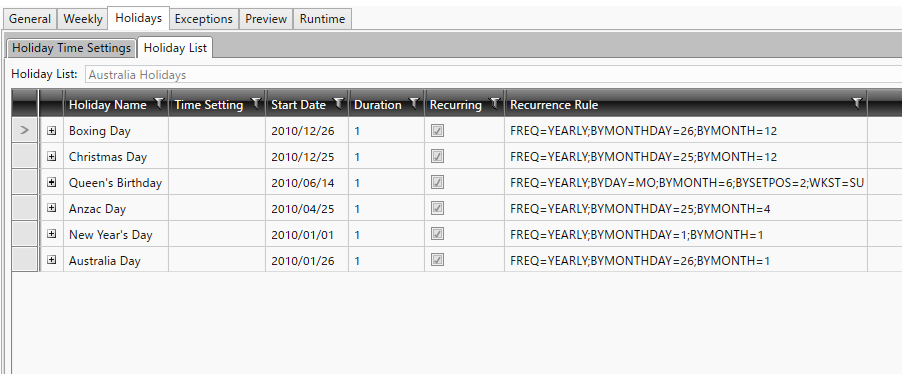
On a Holiday list you will be able to view current Holidays associated with each Schedule. You can associate Holidays to a holiday list for ScheduleWorX64 inside Workbench. You must associate Holidays to a Holiday List before you can apply it to any Schedules.
View Holiday List
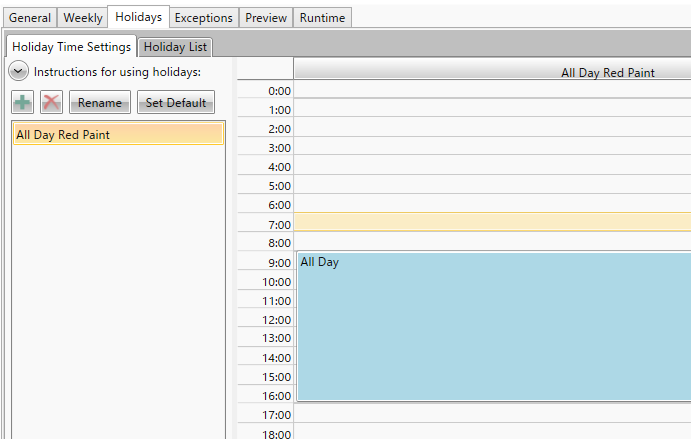
• On the Holiday Time Settings tab, you can create the Schedule Events that you would like to use on each holiday. Press the plus  button to add a Time Setting and then on the right-side calendar add a new Event associated with a value set.
Manage Holiday Time Settings
Click on the Holiday list tab again and associate Time Settings created in previous step with each holiday. You can do this by clicking on the dropdown list under Time Setting column.
Associate Holiday Time with Holiday
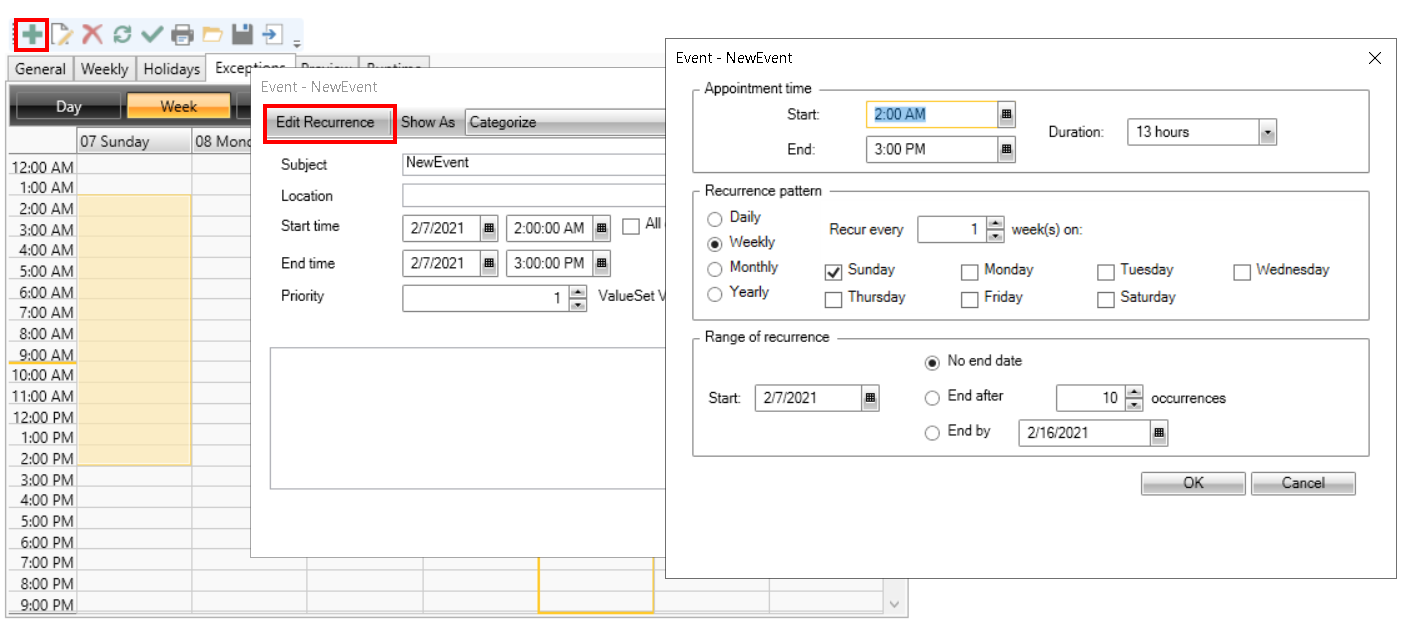
Exception events work similar to events inserted in the Weekly tab, but exceptions have a higher priority. Exception events will always occur instead of a weekly event if they share a time slot. Unlike events inserted in the Weekly tab, Exceptions do not repeat weekly by default.
Exceptions give greater flexibility by allowing the events to be set to repeat daily, weekly, monthly, annually, or any combinations thereof (occur on the third Friday every October, occur on the first Monday every 2 months, etc.). Exceptions also give the option to set the start/end date of the recurrence of a particular exception event (example: Annual meeting on the third week of August occurs until August 2023).
Adding Exceptions
The Preview Tab allows us to view all Scheduled events in Daily, Weekly, Monthly and Timeline view. This is view-only mode and does not allow editing of Events.
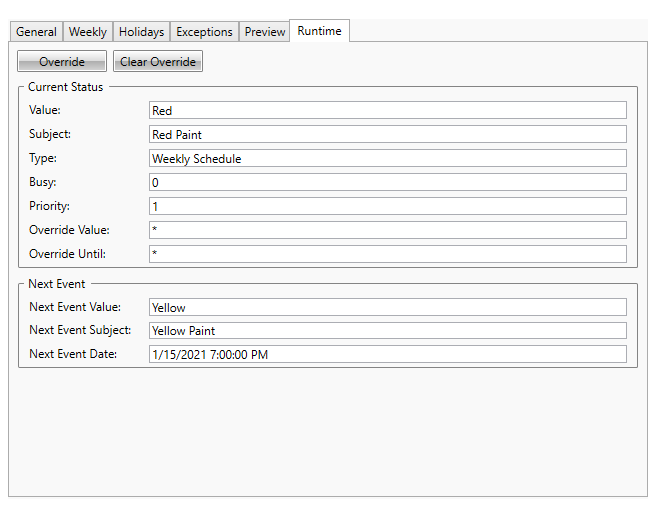
This Tab allows us to view which Event is currently active and it also allows us to override the event with another value.
View Current Events and Overrides
Click on the Override button to select another Value. You can also override an event for a certain period of time.
Apply Overrides
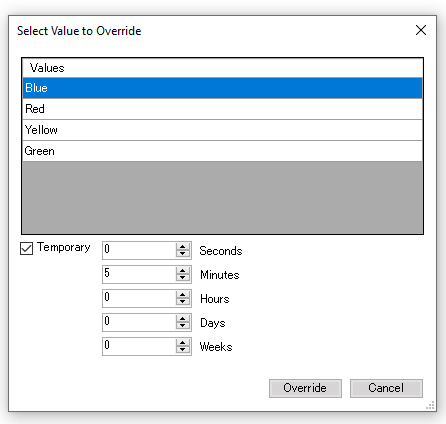
You can clear any overrides by clicking on the Clear Override button.
You can use the Schedule Control to connect to schedule objects exposed by BACnet.
Insert the control and start editing the configuration as you did in the first section, but instead of editing the existing ScheduleWorX View, right click on Tab on the left navigation pane and add a new BACnet Schedule View.
In the Source tab you can browse for a schedule via connected BACnet devices. You can also select a data source by entering the desired BACnet device's Device ID and Schedule Instance.
NOTE: In case you want to connect to a remote FrameWorX Server you can specify a FrameWorX Server Location in the appropriate field.
When you enter runtime, you may edit the schedule object the same as in Workbench. For more information see the application note titled, Platform Services – BACnet Schedules.
See Also:
Schedule Control Configuration