![]()
![]()
Version 10.96 includes improvements to GraphWorX64 to make it easier to edit displays for HTML5 clients. Custom fonts can now be embedded into the display to ensure that all clients can display your desired font, a new HTML5 edit mode has been added, and we’ve made it easier to launch your displays in a browser to ensure they look the way you want them to at runtime.
Custom can now be embedded in GraphWorX64 displays and delivered to your client devices automatically. Currently TrueType (.ttf) and OpenType(.otf) fonts are supported. All client types (desktop/WPF, HTML5, and Universal Windows Platform) can use the custom fonts.
Make sure you are in advanced application mode by going to the View tab and selecting Application Mode > Advanced Mode.
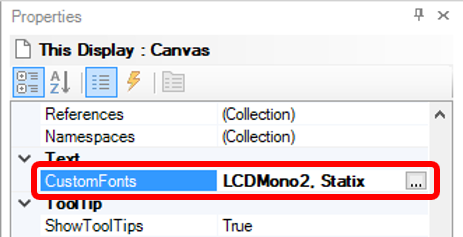
Select the canvas (by deselecting all objects), then open the Properties panel and scroll to the Text section to find CustomFonts. Click the … button to open the Edit File List window. Here you can add files or folders for the custom fonts you would like to include with this display. Font files can be specified as either absolute or relative paths.
Properties - This Display : Canvas
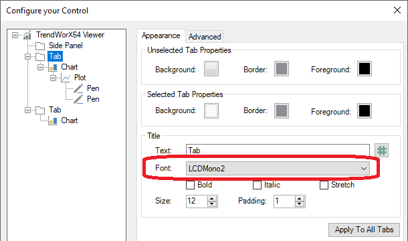
After selecting the font files, these fonts will be available to be selected anywhere in GraphWorX64 or its controls where a font can be chosen.
Configure your Control - Font Selection
At runtime, if a font file cannot be downloaded or accessed for some reason, objects that use that font will use a default font.
The GENESIS64 Web Publisher will public font files referenced by GraphWorX64 displays. Font files are published to the destination server if they are specified in the GraphWorX64 display as a local file path (absolute or relative). Font files that are specified as absolute http URLs are not published (their original web URLs will be retained as specified).
To assist in configuring HTML5 displays, GraphWorX64 now has a new HTML5 edit mode, which hides any features or components that are not usable in HTML5 displays.
New in 10.96, GDFX files are now the default file format for HTML5 displays. In 10.95 and earlier the preferred HTML5 format was GDFXP. If your clients are desktops, web browsers, iOS apps, and/or Android apps then you can use GDFX displays.
In 10.96, GDFXP files are only required if you have clients using the Universal Windows Platform (UWP) app. GDFXP files can still be loaded in desktop (WPF) and HTML5 (web browser, iOS app, Android app) clients, so you do not need to create two sets of files if you have some UWP clients.
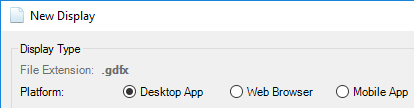
When creating a new display using the New Display form (launched from File > New Settings), choosing a Platform of Desktop App, Web Browser, or Mobile App will result in a GFDX file extension in most cases. Choosing a Platform of Mobile App may result in a GDFXP file if the Device chosen requires a GDFXP file (such as a HoloLens*).
*Note: HoloLens support is limited to HoloLens 1 (first generation) only.
The exact file extension you will get will be displayed at the top of the dialog.
New Display - Select Display Type
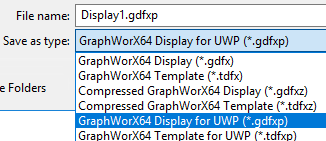
If you need to change from a GDFX to GDFXP after your display has already been created, you can also do a Save As and choose GraphWorX64 Display for UWP (*.gdfxp).
Selecting GraphWorX Display for UWP (*.gdfxp)
Choosing a particular platform in the New Display dialog will launch the editor into the matching edit mode, though the edit mode can be changed later.
There is a new mode dropdown menu in the status bar, next to the security login display. It displays the current edit mode you are in and allows you to change it. There are different sets of modes based on the file type of display you are editing, GDFX or GDFXP.
GDFX Modes
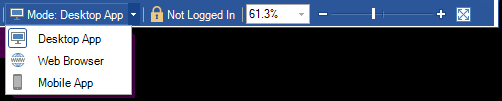
Desktop App: All features are available.
Web Browser: Features which cannot be used by HTML5 clients are hidden.
Mobile App: Features which cannot be used by HTML5 clients are hidden. Additional mobile-friendly features are made available, such as device orientation simulation and faceplates.
GDFXP Modes

UWP App: Features not available to Universal Windows Platform (UWP) apps are hidden.
All Mobile Platforms: Features are hidden unless they are available to both Universal Windows Platform (UWP) apps and HTML5 apps (web browser, iOS, Android).
Note: Switching modes only prevents you from adding new elements that are not compatible with the current version. If you already have an incompatible element it will not be removed from your display. For example, 3D Viewers are not currently supported in HTML5 clients. If you are in Desktop App mode, you can add a 3D Viewer. If you then switch to Web Browser mode, the 3D Viewer will no longer be available in the ribbon, however the existing 3D Viewer you already added to the display will remain.
Because GraphWorX64 is not truly an HTML5 client and cannot always predict what a true HTML5 client will look like, it has been a common editing technique for the user to open up a web browser alongside GraphWorX64 so that they can see the actual published HTML5 display. ICONICS has made this easier by adding an Open in Web Browser button.
Displays which are saved in a web-accessible folder (such as AnyGlass or PubDisplay) and in Web Browser, Mobile App, or All Mobile Platforms mode will see the new Open in Web Browser button available near the Runtime button.
Open in Web Browser Button
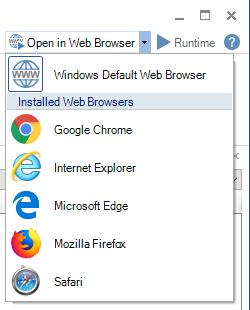
This new button allows you to quickly launch your display in a web browser to get an idea of what it will look like to your clients.
By default, this button will open the display in the system’s default web browser, but the user can choose a specific installed web browser from the dropdown menu. The choice will be remembered, so the user can click the button again (without opening the dropdown) to launch in the last chosen browser. They can also choose Windows Default Web Browser again to go back to using whatever is set as the system default.
Only installed browsers will be displayed in the dropdown list.
Note: Clicking the button multiple times will open multiple copies of the display in different browser windows or tabs, depending on the browser’s settings. Unfortunately, GraphWorX64 cannot detect if a window or tab with the same display is already open. The user is encouraged to use the browser’s refresh button or the F5 key to refresh the display after making changes if they do not want to open multiple windows or tabs.
See Also: