
A Data Trigger executes an event every time a tag becomes TRUE or FALSE. That event can be sent to a data tag and used by a program to determine whether an action should proceed or not. Lets say that you want to log data in the Hyper Historian , but only when the system of interest (Machine_22) is actually running. You could create a data trigger that sets a data trigger that sets the data flag to TRUE when the system starts up. In the figure below the Machine_22_on data trigger has its value set to TRUE and has that value sent as an event to a PLC INPUTS.BIT.value tag (here a simulator).
Setting a Data Trigger Tag
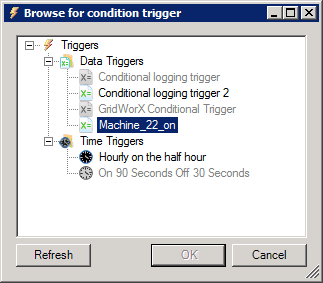
With the Data Trigger defined you can set the condition within another application such that when the data value is true the action occurs. For the Hyper Historian the action defined would be to log to a file based on the condition that the Data Trigger is TRUE; namely when Machine_22 is on and sending values to the tag. You would set the condition in the Logging Group form's Collecting Condition section by clicking on the ellipsis [...] button in that section to open the Browse for condition trigger dialog box shown below.
Browse For Condition Dialog Box
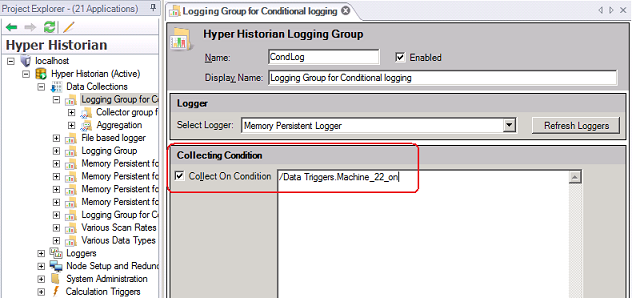
The Data Trigger is shown in the Hyper Historian Logging Group form below. When the flag is TRUE logging will then occur.
Collecting Condition Based On Data Trigger
Data triggers are organized in a tree structure of folders and data trigger tags (items). Folders allow organization of data tags into a hierarchical tree structure.
To create a new data trigger folder:
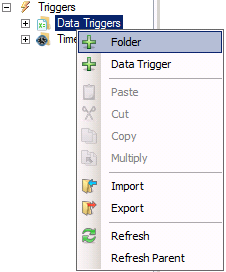
In the Unified Data Manager, right-click the Data Triggers node in the Project Explorer and select Folder from the menu, as shown in the figure below.
Creating a New Time Trigger Folder
In the Data Trigger Folder tab that opens, in the Name field, type a name for the new folder.
Click the Apply button. The new folder appears under the Data Triggers tree control.
To create a new data trigger item:
In the Unified Data Manager, in the Project Explorer, right-click either the Data Triggers node or on a folder in that node and click Data Trigger, as shown in the figure below.
Creating a New Data Trigger Item

In the New Data Trigger tab (shown below) that opens, ensure that the Enabled button is enabled if you intend for the trigger to be active after you define it.
In the Name field, type a name for the new time trigger.
Data Trigger Form

In the Description field, you can type a description for the new time trigger (optional).
Select the trigger type in the Trigger Type drop-down list.

Set the tag in the Data Tag text box, either by directly typing it or by clicking on the Browse button and selecting it from the Unified Data Browser.
Click the Apply button. The new time trigger item appears under the Data Triggers node or in the folder that you clicked on in Step 1.
The Advanced tab in the Data Trigger form offers you more control over your data trigger. Options in this dialog box allow you to control the time zone; when the time that the trigger is operational begins, ends or is delayed by; sets a reparation interval, and when a tag value is valid or not. Refer to the figure below to view these options.
Advanced Data Trigger Conditions

The options found on the Advanced tab offer the following capabilities:
Time Zone. You can select an option to use the local time zone of your system or switch to UTC, the Universal Time often referred to as Greenwich Mean Time or GMT.
Start. The Stop time begins the period during which the data trigger remains active and changes state. The condition in place at the end of the period remains in effect after the condition period ends.
Stop. The Stop time ends the period during which the time trigger remains active and changes state. The condition in place at the end of the period remains in effect after the condition period ends.
Delay trigger by. The Delay trigger by time interval is a one time setting that moves the starting date and time by the number of days, hours, minutes, and seconds that you set in these combo boxes.
Enable on Tag. Enable this check box to links the recurrence of a time trigger to a specified data tag value. Enter the tag name in the Enable Tag field.
Enable Tag. Specify a tag on which to enable the recurrence condition. Clicking the … button allows you to select a tag from the Unified Data Browser. The trigger will be disabled if Enable Tag has a value of 0, FALSE, or BadQuality).
See also: