BACnet Configuration Using Workbench
NOTE: The following describes how to configure BACnet settings via the Workbench.
For info on Auto-Discovery, click HERE.
GENESIS64’s BACnet implementation is an out-of-the-box solution that does not need configuration by default. BACnet devices in a local network are discovered automatically, together with their specific settings and address spaces (provided objects and their properties), which are used for connection. (NOTE: Read more about this feature in Auto-discovery of Devices).
The steps described below are useful in cases where you need to:
- override settings of a specific, automatically discovered device, or
- override objects and/or property names exposed by specific devices, or
- add a new device that has not been automatically discovered (e.g. because it is in a different IP network subnet).
It is important to realize that this BACnet Configuration Provider is used for the configuration of Global BACnet Runtime settings; for providing the BACnet Runtime connection with information for specific BACnet devices and for driving what information is exposed by BACnet Runtime (device, object and property names).
- Launch Workbench64 from Start -> Programs -> ICONICS GENESIS64 -> Workbench.
- Click the BACnet icon in the Workbench project explorer.
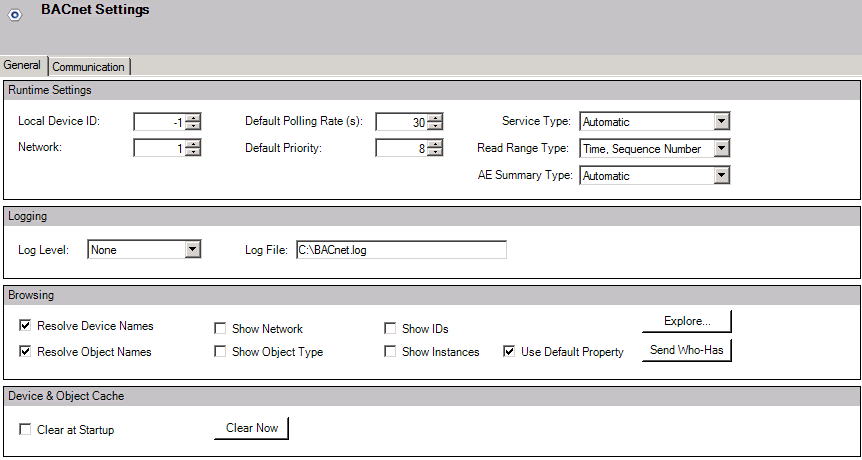
- Once your BACnet configuration opens, you can select Devices by double-clicking on the item and go to the ‘Communication’ tab, then you will see the setting for your devices.
- Enter the settings for: APDU Timeout, APDU Segment Timeout, and APDU Retries in the ‘Communication’ tab and Default Polling Rate and Default Priority in the ‘General tab’
Figure 1 - BACnet Settings for Devices
- If you made changes, click the Apply button.
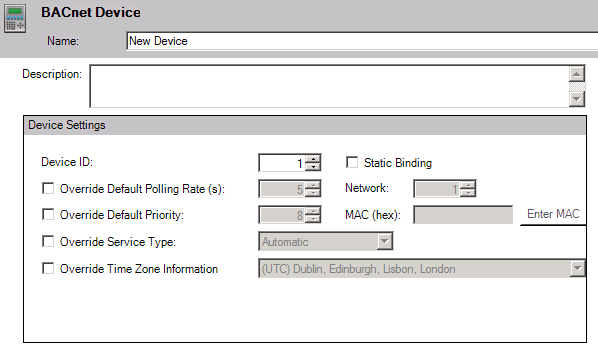
- Now, you need to Add a New Device. Right-click on Devices and choose Device or click the button from the toolbar and select Device. The Device tab will display.
- Type a name in the Name textbox.
- Type a description in the Description textbox, this is optional.
- Type a device ID in the Device ID box.
- You can leave the default polling rate as it is unless you want to override it, then select the ‘Override Default Polling Rate(s)’ checkbox and enter the value in second. Same goes for the Default Priority.
- Enable Static Binding (optional).
- Type a Network number.
- Type a MAC ID.
- Click on the Apply button when you are satisfied with the configuration.
Figure 2 - BACnet Device
- Now, you are going to Create a New Object under your device.
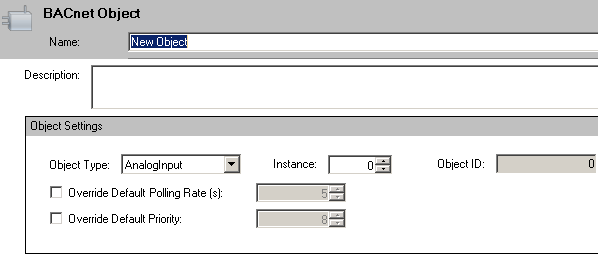
- Right-click on your Device and choose Object or click the button from the toolbar and select Object. The Object tab will display.
- Type a name in the Name textbox and give an option Description.
- Specify the object Type in the Object Type dropdown menu (AnalogInput by default) and specify the right Instance # (usually 1). Object ID should be generated automatically.
- You can leave the default polling rate as it is unless you want to override it, then select the ‘Override Default Polling Rate(s)’ checkbox and enter the value in second.
- Same goes for the Default Priority.
- Click the Apply button.
Figure 3 - BACnet Object
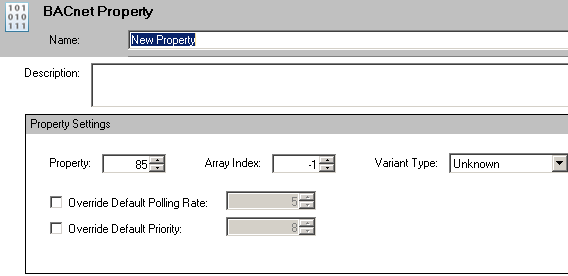
- Now, you are going to Create a New Property under your object. Right-click on your Object and choose Property or click the button from the toolbar and select Property. The Property tab will display.
- Type a name in the Name textbox and an optional description in the Description textbox.
- Type a property number in the Property box.
- You can leave the default polling rate as it is unless you want to override it, then select the ‘Override Default Polling Rate(s)’ checkbox and enter the value in second.
- Same goes for the Default Priority and click the Apply button.
Figure 4 - BACnet Property
- The last thing you need to do is create a port for your device. Right-click on your Ports (left tree) and choose Port or click the button from the toolbar and select Port. The BACnet Port will come up.
- Type a name in the Name textbox and give an option Description if you wish.
- You can then enter the Channel type, network number, adapter, and the IP settings. Click Apply to confirm.
Figure 5 - BACnet Port
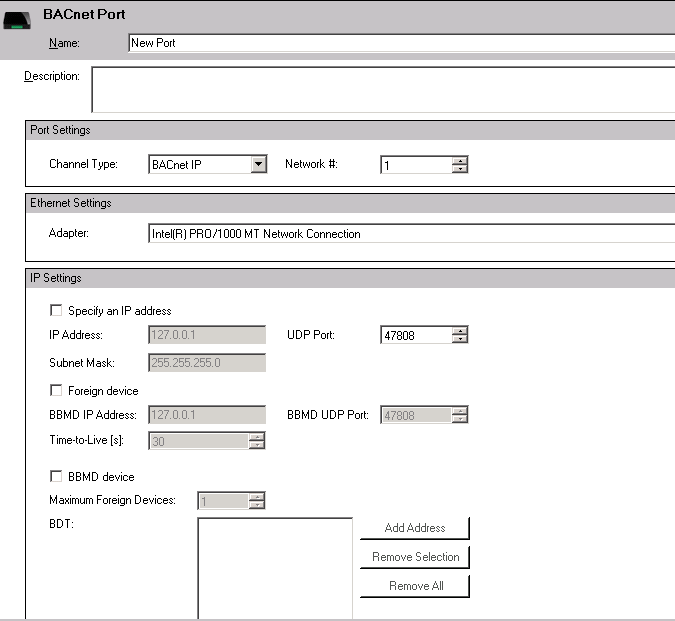
NOTE: Please notice that default BACnet communication is based on IP protocol, where default port (47808) can be changed (under the Ports) if you really need it, but in most of the cases you can run with the default settings. Also notice that Ports in Workbench64 are ICONICS proprietary interfaces created specifically for BACnet communication where the IP port is not equal to a Workbench64 port.
See Also:
BACnet Configuration Quick Start
BACnet Client-Server Architecture
BACnet in Workbench64