In the Global Aliasing Configurator , the parameters for themes are set up in the Themes tree control, as shown in the figure below. Note that themes are not required for using global aliasing.
When configuring themes, you can:
Create new themes.
Define theme values.
Specify a default theme value for each theme.
Enable or disable themes and theme values.
Add themes and theme items to the Theme Browsers.
Determine how themes and theme items are displayed and described in the Theme Browsers.
First create a theme, then define its values.
To create a theme:
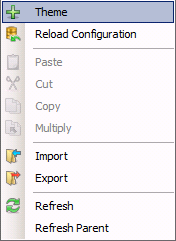
Right-click on Themes in the Project Explorer and select Theme from the menu as shown below.
Themes Menu

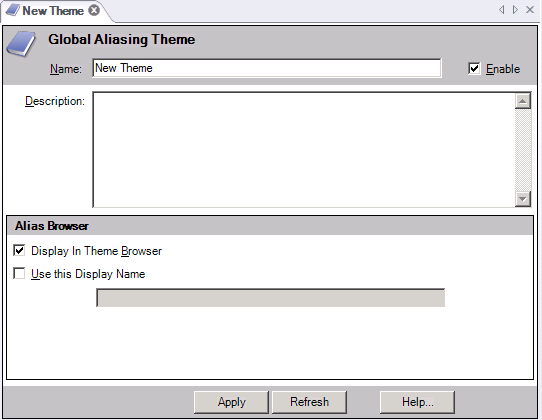
Enter the name, description, and display properties; then click the Apply button.
The Theme Form

All of the properties other than the name (which much be unique) are optional.
|
|
Note. Of particular importance in the Theme Property pane is the Enable check box. Themes are only available to other programs through the Global Aliasing Server and appear in the Unified Data Browser only when Enabled is enabled. |
To define a theme's values:
Once you have created the theme, you can define theme values for it.
From the navigation tree in the Project Explorer, right-click the theme, then select Theme Value from the popup menu. The Theme Value form appears.
Enter a name for the value.
Note the Default Theme Value checkbox. A check mark here indicates that the alias value that gets assigned to that particular theme value will be the default value for its global alias. For most themes, you will want to identify one theme value as the default so that, during runtime, when no value is selected, the global alias resolves to a value in all instances. Tips for easily identify the default include: always choosing the first theme value as the default, or including the word DEFAULT in the theme value's name, or using some other way to make it easy to identify the default value.
Specify whether you want the value to appear in the Theme Browser. If you don't want the value to be made a available for use, remove the check mark from the Display in Theme Browser checkbox.
In the Use This Display Name field, you can specify a name to appear for the value in the Theme Browser. For example, if the value 1 represents the building on Main Street, you can type Main Street in this field so that Main Street appears in the browser, but the value 1 is used for the theme.
When you are done, click Apply. The value gets added to the tree view, under the theme.
Once you have defined a theme, you can define the global aliases that will be associated with that theme, along with the alias values that get used with that theme. A theme, however, is not required for defining a global alias. For more information, refer to Working with Global Aliases.
To edit a theme:
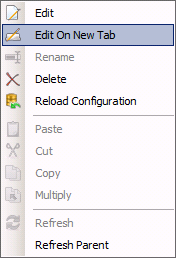
Right-click the theme and select Edit or Edit on New Tab from the menu as shown below.
A Theme Context Menu

Make your changes in the properties pane; then click the Apply button.
Notice that this context menu also allows you to rename, delete, cut, paste, and copy aliases and alias folders. The Global Aliasing Server allows other users to change themes at any time, so if you want to work with the latest values use the Refresh or the Refresh Parent commands.
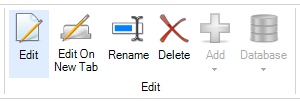
The Workbench's Home ribbon displays an Edit gallery, shown below, that duplicates the commands on the context menu. The commands that appear in the Gallery and whether they are enabled is determined by the object that is currently selected in the Project Explorer's navigation tree.
Home Ribbon Edit Gallery for Global Aliasing

See Also: