GENESIS64 supports redundancy for 64-bit clients (i.e., GraphWorX64, AlarmWorX64, and TrendWorX64). It also supports the following OPC servers in both 64-bit and 32-bit:
NOTE: TrendWorX64 is not redundant.
This means that in GENESIS64 you can set up redundant servers for:
Redundancy can be added to an existing OPC server/client application, without any reconfiguration of those applications; the only required downtime is a restart of the FrameWorX64 Server. To set this up, you must have the parallel clients and servers available and attached, ready to be configured as redundant machines.
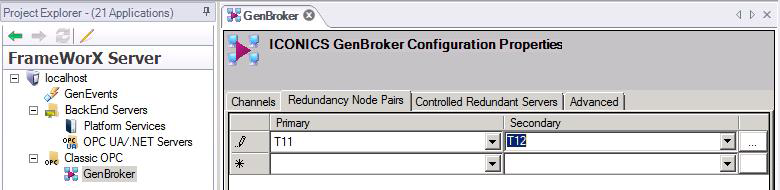
Classic OPC redundancy works with the 64-bit and 32-bit OPC servers listed below. To set up redundancy for classic OPC servers, you define node pairs; a node pair specifies the primary server and the redundant (secondary) server. Use the steps to set up redundancy for the following types of servers:
* For redundant AlarmWorX64 Server, AlarmWorX32 Server, and TrendWorX32 Server, the same redundant node pairs must be defined on each node. For example, if you have AlarmWorX32 Servers on PC1 and PC2 and FrameWorX64 on PC3, you must define the same node pairs on all three computers.
For AlarmWorX64 Server and Logger, you can define node pairs through the GENESIS64 Workbench, but for AlarmWorX32 Server and TrendWorX32 Server and Logger, use GenBroker.
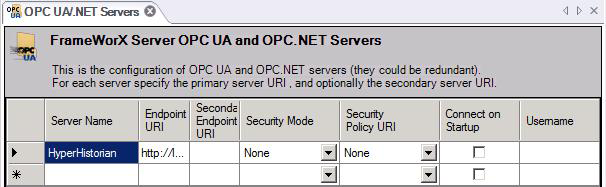
OPC UA redundancy works with the 64-bit and 32-bit OPC servers listed below. Use the steps to set up redundancy for the following types of servers:
NOTE: OPC UA redundancy works with for Data Access and Historical OPC UA servers. Alarms & Conditions OPC UA Servers are not supported.
NOTE: The GenBroker communication options can be set here, too.
Setting up Primary and Secondary Redundant Servers
Server Node Properties

Setting up Redundant UA Servers
At this point, you have completed most of the process for setting up redundant servers. The one thing left to do is make sure that your primary and secondary servers have the same server configuration.
For example, you could use the ICONICS.Simulator server. After installation, the configuration for both primary and secondary servers should be the same unless you have changed one of them. You can generally use a tag from the simulator to test your redundancy setup. It is recommended using one data source for both servers. This means, that you have one special machine, which provides data to you servers.
We provide redundancy with AlarmWorX64 in this version. After setting up GenBroker, your alarm server should be all set for testing provided that the configuration on the primary and secondary are exactly the same. For this reason, you may consider putting the configuration database in a centralized location where it can be accessed by both the primary and secondary servers. This way, you will not have to update two configurations when you need to make change.
NOTE: If your configurations are different on the primary and secondary servers, you will experience unpredictable behavior. Therefore, if you do keep the configuration in separate databases, please make sure that you update both when you make changes, and that the updates are exactly the same on both databases. The easiest way would be to copy the updated configuration database from the Primary to the Secondary server as you make changes.
When you are ready to test your scenario (configuration), you can use GraphWorX64 on a client machine. For the simplest test, you can browse to a point in the simulator. The syntax for this point must start with the primary server name. For example, if you are using the simulated Sine tag, your tag path should be similar to the figure shown below, where “PrimaryServer” is either the name of your primary computer or its IP address.
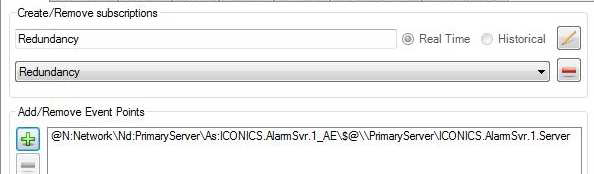
Similar to the way tags are setup, in your alarm viewer, you need to add the primary server as the node name. Your setup should look similar to the figure below where “PrimaryServer” is the name of your primary computer.
Alarm Viewer Subscription
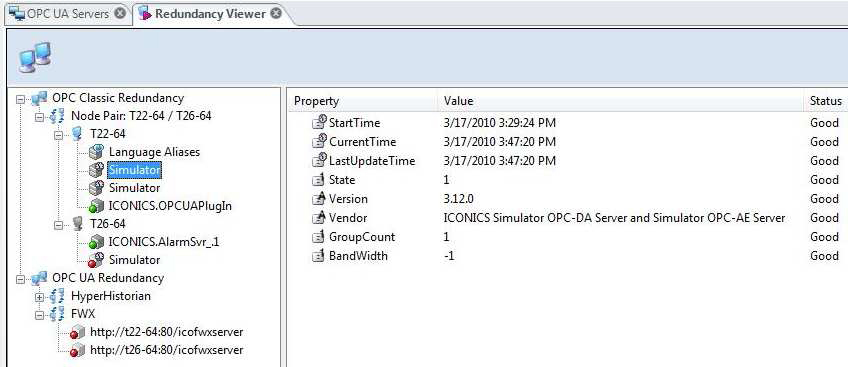
You can test that redundancy works by shutting down the primary server and observe on the client machine that data source will properly switch to the secondary server, so you are still able to see/get valid data. Also notice the active server
change in Redundancy Viewer of the client machine.
Checking Redundancy Servers
See also: