A Recipe is a list of ingredients that is used to create a product. A recipe specifies the amount of each ingredient and is categorized by product variation. In RecipeWorX, recipes simplify work with a large set of data tags (recipe parameters). Each recipe consists of any number of recipe parameters.
The Recipes branch within the Project Explorer in Workbench enables you to specify a list of ingredients that are used to create a product, such as cookies. Features of recipes include:
Create and edit recipes (products).
Create folders for recipes.
Create and edit recipe items (product variations).
List types of ingredients (e.g. flour, sugar, oil) used to create a product (e.g. cookies).
Specify the amount of each ingredient needed.
Categorize recipes (e.g. version, flavor, or color) by product variation (e.g. chocolate chip, oatmeal, or peanut butter).
Easy runtime integration to select recipes within applications.
Display and edit recipe data within applications.
Import/export recipe configurations from/to XML and CSV files.
RecipeWorX consists of the following key components:
Workbench - RecipeWorX – Allows configuration of recipes
GraphWorX64 controls:
Recipe Navigator (tree) – Used to browse for recipes and recipe items in Runtime.
Recipe Grid control – Displays the recipe parameters in Runtime.
Commanding – Provides support for important actions related to recipes.
Recipe Point Manager (FwxRecipeService) – the engine that handles recipe processing.
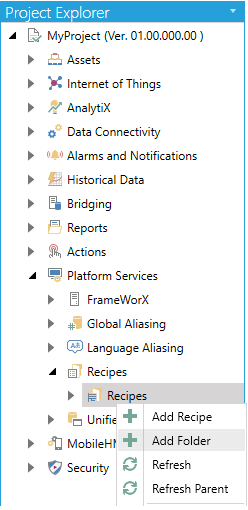
To Add a Recipe Folder:
Open the Workbench, then expand your project, then expand the Platform Services node, then the Recipes node.
Right-click the contained Recipes node then click on Add Folder, as shown below.
Add Folder from the Project Explorer
-OR-
Select the contained Recipes node then click on the Add Folder button, shown below, in the Edit section of the Home ribbon in the Workbench.
Add Folder Button

This opens the Folder properties, shown below, beneath the Project Details section of the Workbench. Enter a name in the Folder Name text entry field.
Folder Properties
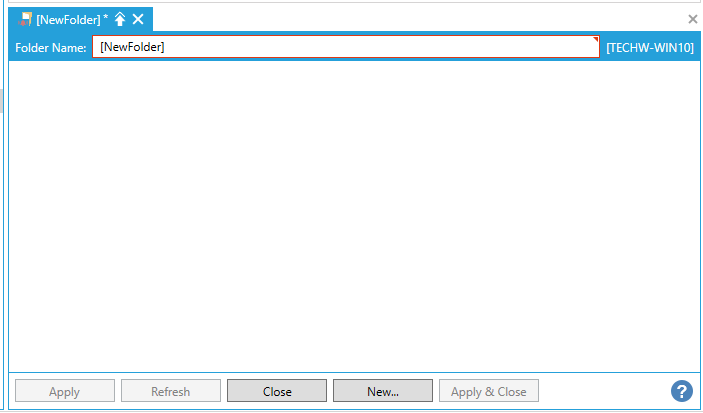
Click Apply to save your changes then Close to return to the Workbench. Your new folder will now appear in the Project Explorer within the selected Recipes node.
The following section provides an overview of how recipes are configured. Recipes are organized in a tree structure of folders, subfolders, recipes, and recipe tags (items).
Folders (product category): Folders allow organization of recipes into a hierarchical tree structure of different recipe categories. For an example of use, recipes could be contained in a folder named Pills.
Subfolder (product type): Subfolders enable you to further categorize recipes by product type. Using our previous example, the Pills folder could contains subfolder called Aspirin, Cold Relief, and Pain Relief, which contain different product recipes for pills.
Recipe (product variations): A recipe represents a variation of a specific product type. For each product type, you can have multiple recipes. Using our previous example, the Pain Relief folder could contain recipes for Acetaminophen, Ibuprofen, and Naproxen.
Recipe items (recipe variations): Each recipe consists of any number of recipe items. Using our previous example, the Acetaminophen recipe could contain recipe items for both Extra Strength and Regular varieties.
The recipes and recipe items that you configure in Workbench are available as data tags that can be used in several different GENESIS64 client applications. Note, the steps to create a recipe are similar for creating a recipe folder.
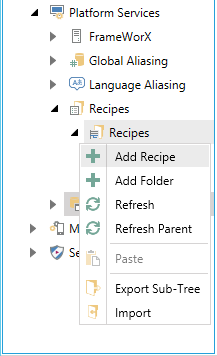
To Create a New Recipe:
Start the Workbench, then expand your project. Next, expand the Platform Services node to show the Recipes node.
Right-click the Recipes node in the navigation tree and select Add Recipe, as shown in the figure below.
Add Recipe from the Project Explorer
-OR-
Select the Recipes node in the Project Explorer, then click on the Add Recipe button, shown below, in the Edit section of the Home ribbon in the Workbench.
Add Recipe Button

This opens the Recipe properties window, shown below, beneath the Project Details section in Workbench. Enter a unique name in the Recipe Name field.
Recipe Properties
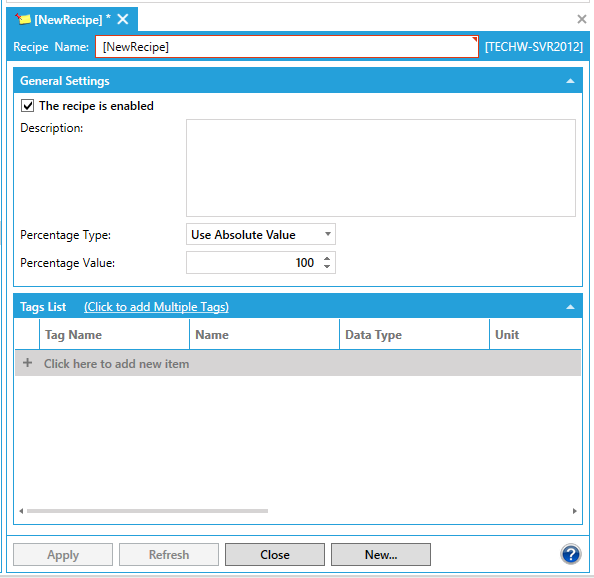
In the General Settings section of the window, check the The recipe is enabled checkbox to activate the recipe in the recipe server configuration.
Enabled recipes are available to client applications.
Enter a Description for the recipe (optional) in the text entry field..
Use the Percentage Type pulldown to select from either 'Use Absolute Value' or 'Use Tag'. A Percentage allows you to create a smaller or larger variation of a recipe without needing to change the individual values in each of the Recipe items. When the values are downloaded to the data tags, the percentage will then be applied values downloaded.
If you selected 'Use Absolute Value', you'll be able to enter a Percentage Value in the text entry field. If you selected 'Use Tag', you'll be able to enter a tag name in the Percentage Tag text entry field or click on the  button to open the Data Browser to select your preferred tag.
In the Tags List section, you can enter a Tag Name in that column or click on the button to open the Data Browser to select your preferred tag. You can also provide a Name in that column field. The Data Type column field turns into a pulldown menu, where you can select from NATIVE, FLOAT, DOUBLE, BOOL, BYTE, WORD, DWORD, CHAR, SHORT, LONG or STRING. You can then enter a Unit in that column field.
Click the Apply button to enforce your changes.
See Also: