This topic introduces IT administrators to the fundamental concepts needed to successfully configure multiple Local Group Policy objects on stand-alone computers. Below is a step-by-step description which helps you to understand how Windows applies each Local Group Policy object and how it resolves conflicts with policy settings.
Prerequisites
To properly perform the examples, the following two prerequisites are required:
Create a Custom Management Console
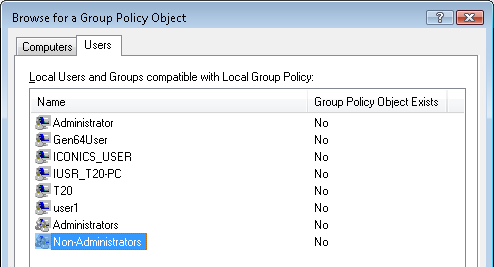
You access Multiple Local Group Policy objects using Group Policy Object Editor. You must add Group Policy Object Editor to the Microsoft Management Console for each Local Group Policy object you want to manage. You should consider creating a custom management console for Multiple Local Group Policy objects (MLGPOs) if you are going to manage many MLGPOs.
Figure 1- Browsing for the Non-Administrators Local Group Policy
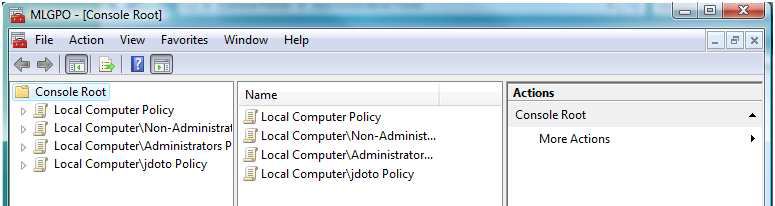
Figure 2 - View of the Newly Created MLGPO Console
Multiple Local Group Policy Scenarios
The following scenarios show you how to apply Group Policy settings in different layers:
NOTE: The policy settings in these scenarios change visual elements within the user environment, making it easier to notice changes for each Local Group Policy object. These policy settings are not the recommended policy settings for a kiosk scenario and are likely to change with each kiosk environment. Administrators should carefully consider all policy settings to decide which policy settings are proper for their environment.
Local Group Policy Scenario
The Local Group Policy object contains both computer settings and user settings. You can use the Local Group Policy to apply policy settings specific to the computer and common policy settings that apply to all or most of the users of the computer.
Define Local Group Policy:
You have successfully defined policy settings in the Local Group Policy object. Now, check the results of the policy settings you performed in Local Group Policy.
To check the results, you can open an Internet Explorer window and click on Tools -> Internet Options. You will see that the features you denied are no longer available.
Non-administrators Local Group Policy Scenario
The Non-Administrators Local Group Policy object contains user policy settings. Windows applies settings in this Local Group Policy object to users who are not members of the local administrators group. In this scenario, you will configure policy settings in the Non-Administrators Group Policy object using the list of policy settings from Table 2. These Policy settings will change the behavior of the Start Menu and taskbar.
Define Non-Administrators Local Group Policy:
You have successfully configured policy settings for the Non-Administrators Local Group Policy object. Check the results of editing the Non-Administrators Local Group Policy object and check how it works with the Local Group Policy object.
To check the results, logon to the workstation with previously created non-administrative user account. Icons do not appear on the desktop. Open the Start menu and you will see that icons are not displayed there. Also the shortcut menu does not appear in taskbar, and the run command is not accessible. You can compare the behavior of Start menu and Internet Explorer between two different users when you log off with nonadministrative account, and log in with administrator account.
Administrators Local Group Policy Scenario
The Administrators Local Group Policy object contains user policy settings. Windows applies this Local Group Policy object to users who are members of the local administrators group. Use the Administrators Local Group Policy to set policy settings only for local administrators. In this scenario, you will set a single policy setting, which will add a command to the Start menu for administrators.
Define Administrators Local Group Policy:
To check the results, logon to the computer as local administrative user you created during the installation of Windows. Open the Start menu and you will see all the programs and features available there. When you log off of the computer and log on as the non-administrative user you will not see anything available in the start menu. That means, there are no limitations for administrative user, but non-administrative user is strictly limited.
User-Specific Local Group Policy Scenario
User-specific Local Group Policy objects contain user policy settings and apply to a specific local user. It is not necessary to setup this specific scenario because standard setting for regular windows user will be taken from standard Local Group Policy.
NOTE: You should follow "Local Group Policy Scenario" before following the current scenario. The policy settings in this scenario conflict with policy settings enabled in "Local Group Policy scenario." If you decide to change anything in this section, don’t forget to double check the changes you made by logging the specific user into your computer.
These scenarios show some of many ways you can configure Multiple Local Group Policy objects. You can use Local Group Policy to set global limits and then use the Administrators, Non-Administrators, and user-specific Local Group Policy objects to remove the limits. Alternatively, you can use each Local Group Policy to restrict the respective group or user it applies to.
Delete a Local Group Policy Object
Occasionally, you may need to remove the entire Local Group Policy object rather than change multiple policy settings. Use the following procedure to delete the Administrators, Non-Administrators, and user-specific Local Group Policy objects.
NOTE: You cannot delete the Local Group Policy object. You must set each policy setting to Not Configured to return the Local Group Policy object to the default settings.
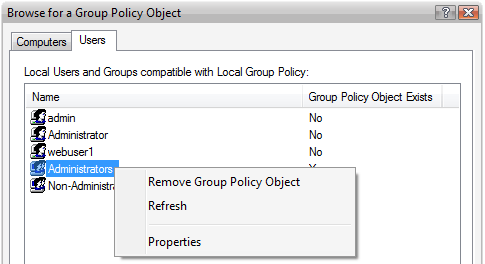
To Delete a Local Group Policy Object:
Figure 3 - Removing a Local Group Policy
NOTE: After deleting a Local Group Policy object you change all the defined policy settings back to Not Configured. This removes any of the policy settings that you previously applied to the user. Don’t forget to double check the results after deleting a Local Group Policy object. You can simply log on with local administrative user or nonadministrative user and check that it has been changed back to default settings.
Tables Containing Local Group Policy
These two tables contain the necessary settings for Local Group Policy and Non-administrators Local Group Policy. You should not change any policy settings do not appear in this appendix. Changing additional policy settings may alter the results of the scenarios described in this guide.
Table 1 - Local Group Policy
|
Location |
Policy |
State |
|
Internet Explorer\Internet Control Panel |
Disable the Advanced page |
Enabled |
|
Internet Explorer\Internet Control Panel |
Disable the Connections page |
Enabled |
|
Internet Explorer\Internet Control Panel |
Disable the Content page |
Enabled |
|
Internet Explorer\Internet Control Panel |
Disable the General page |
Enabled |
|
Internet Explorer\Internet Control Panel |
Disable the Privacy page |
Enabled |
|
Internet Explorer\Internet Control Panel |
Disable the Programs page |
Enabled |
|
Internet Explorer\Internet Control Panel |
Disable the Security page |
Enabled |
Table 2 - Non-Administrators Local Group Policy Settings
|
Location |
Policy |
State |
|
Start Menu and Taskbar |
Clear history of recently opened documents on exit |
Enabled |
|
Start Menu and Taskbar |
Clear the recent programs list for new users |
Enabled |
|
Start Menu and Taskbar |
Add Logoff to the Start Menu |
Enabled |
|
Start Menu and Taskbar |
Turn off personalized menus |
Enabled |
|
Start Menu and Taskbar |
Lock the Taskbar |
Enabled |
|
Start Menu and Taskbar |
Remove Balloon Tips on Start Menu items |
Enabled |
|
Start Menu and Taskbar |
Remove Drag-and-drop context menus on the Start Menu |
Enabled |
|
Start Menu and Taskbar |
Remove and prevent access to the Shut Down, Restart, Sleep, and Hibernate commands |
Enabled |
|
Start Menu and Taskbar |
Remove common program groups from Start Menu |
Enabled |
|
Start Menu and Taskbar |
Remove Favorites menu from Start Menu |
Enabled |
|
Start Menu and Taskbar |
Remove Search link from Start Menu |
Enabled |
|
Start Menu and Taskbar |
Remove frequent programs list from the Start Menu |
Enabled |
|
Start Menu and Taskbar |
Remove Games link from Start Menu |
Enabled |
|
Start Menu and Taskbar |
Remove Help menu from Start Menu |
Enabled |
|
Start Menu and Taskbar |
Turn off user tracking |
Enabled |
|
Start Menu and Taskbar |
Remove All Programs list from the Start menu |
Enabled |
|
Start Menu and Taskbar |
Remove Network Connections from Start Menu |
Enabled |
|
Start Menu and Taskbar |
Remove pinned programs list from the Start Menu |
Enabled |
|
Start Menu and Taskbar |
Do not keep history of recently opened documents |
Enabled |
|
Start Menu and Taskbar |
Remove Recent Items menu from Start Menu |
Enabled |
|
Start Menu and Taskbar |
Do not use the search-based method when resolving shell shortcuts |
Enabled |
|
Start Menu and Taskbar |
Remove Run menu from Start Menu |
Enabled |
|
Start Menu and Taskbar |
Remove Default Programs link from the Start menu |
Enabled |
|
Start Menu and Taskbar |
Remove Documents icon from Start Menu |
Enabled |
|
Start Menu and Taskbar |
Remove Music icon from Start Menu |
Enabled |
|
Start Menu and Taskbar |
Remove Network icon from Start Menu |
Enabled |
|
Start Menu and Taskbar |
Remove Pictures icon from Start Menu |
Enabled |
|
Start Menu and Taskbar |
Do not search communications |
Enabled |
|
Start Menu and Taskbar |
Remove Search Computer link |
Enabled |
|
Start Menu and Taskbar |
Do not search files |
Enabled |
|
Start Menu and Taskbar |
Do not search Internet |
Enabled |
|
Start Menu and Taskbar |
Do not search programs |
Enabled |
|
Start Menu and Taskbar |
Remove programs on Settings menu |
Enabled |
|
Start Menu and Taskbar |
Prevent changes to Taskbar and Start Menu Settings |
Enabled |
|
Start Menu and Taskbar |
Remove user's folders from the Start Menu |
Enabled |
|
Start Menu and Taskbar |
Force classic Start Menu |
Enabled |
|
Start Menu and Taskbar |
Prevent grouping of taskbar items |
Enabled |
|
Start Menu and Taskbar |
Do not display any custom toolbars in the taskbar |
Enabled |
|
Start Menu and Taskbar |
Remove access to the context menus for the taskbar |
Enabled |
|
Start Menu and Taskbar |
Remove user folder link from Start Menu |
Enabled |
|
Start Menu and Taskbar |
Remove links and access to Windows Update |
Enabled |
|
Start Menu and Taskbar |
Show QuickLaunch on Taskbar |
Enabled |
|
Start Menu and Taskbar |
Remove the "Undock PC" button from the Start Menu |
Enabled |
|
Start Menu and Taskbar |
Remove the networking icon |
Enabled |
|
Start Menu and Taskbar |
Remove the volume control icon |
Enabled |
|
Start Menu and Taskbar |
Lock all taskbar settings |
Enabled |
|
Start Menu and Taskbar |
Prevent users from adding or removing toolbars |
Enabled |
|
Start Menu and Taskbar |
Prevent users from rearranging toolbars |
Enabled |
|
Start Menu and Taskbar |
Prevent users from resizing the taskbar |
Enabled |
|
Desktop |
Hide and disable all items on the desktop |
Enabled |
|
Desktop |
Remove the Desktop Cleanup Wizard |
Enabled |
|
Desktop |
Hide Internet Explorer icon on desktop |
Enabled |
|
Desktop |
Remove Computer icon on the desktop |
Enabled |
|
Desktop |
Remove My Documents icon on the desktop |
Enabled |
|
Desktop |
Hide Network Locations icon on desktop |
Enabled |
|
Desktop |
Remove Properties from the Computer icon context menu |
Enabled |
|
Desktop |
Remove Properties from the Documents icon context menu |
Enabled |
|
Desktop |
Remove Recycle Bin icon from desktop |
Enabled |
|
Desktop |
Remove Properties from the Recycle Bin context menu |
Enabled |
|
Desktop |
Don't save settings at exit |
Enabled |
|
Desktop |
Prohibit adjusting desktop toolbars |
Enabled |
|
Windows Components\ Windows Sidebar |
Turn off Windows Sidebar |
Enabled |