
Condition Classes in Hyper Historian provide simple alarming support (alarm events and conditional alarms) for analytics products. Alarm/Events are generated based on calculated values. Data values history can be used to generate an event or change an alarm state. Alarm Limit definitions are configured separately.
Basic Alarm/Event definitions include an alarm value, severity, limit names and messages.
Configuring Condition Classes is similar to configuring Calculations, involving Triggers and Expressions. Event Types (conditions and simple events) are also set. Calculated Condition/Events Tags are then exposed as real-time Alarm/Events, Real-time Values or Historical Values.
To Add a Condition Class:
Open the Workbench and expand your project, then the Historical Data node, then Hyper Historian.
Right-click on the Condition Classes node (or on a contained Condition Class folder), then click on Add Condition Class, as shown below.
Add Condition Class from Project Explorer in the Workbench
-OR-
Select the Condition Classes node (or a Condition Classes folder), then click on the Add Condition Class button, shown below, in the Edit section of the Home ribbon in the Workbench.
Add Condition Class Button

This opens the Condition Class Properties, shown below, under the Project Details section of the Workbench. Enter a name for the Condition Class in the top text entry field.
Condition Class Properties
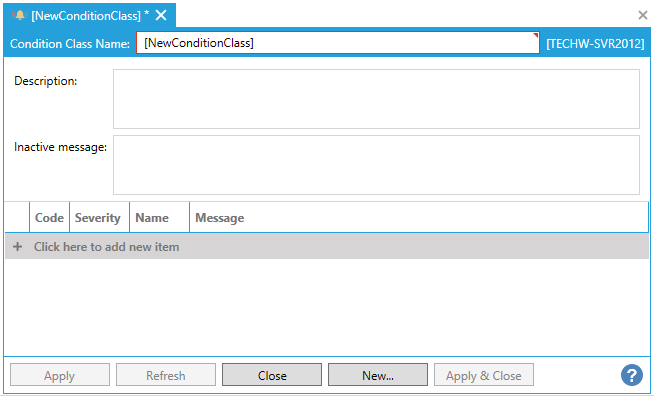
Description - Enter a description of the Condition Class in the text entry field to distinguish it from others. This is not used in Runtime.
Inactive Message - The event message for the state code of '0', which is used as the inactive state.
Click on the + Click here to add new item link. You will then be able to fill out the cells in each column for the newly added item.
Code - The code produced by the expression. Cannot be 0.
Severity - The event severity.
Name - The subcondition name. If this Condition Class is not used for simple events, this value will be visible in the alarm viewer under the Type column.
Message - The event message.
Once you have completed editing items within the Condition Class properties, click Apply to save them and Close to return to the Workbench. Your newly created Condition Class will now appear in the Project Explorer, beneath the Condition Classes node or beneath any pre-selected Condition Class folder.
See Also: