In Hyper Historian, you can create calculation triggers that fire the Performance Calculation Engine to calculate calculated tags. Once you have created a calculation trigger, you can add it to the calculation tags it will execute calculations for.
Calculation triggers are much like regular Unified Data Manager (UDM) triggers except that they are designed to work with historical data. This topic describes how to create time triggers and data triggers for use with Hyper Historian calculated tags.
The Calculation Triggers node in the Hyper Historian tree structure in the Workbench is where you will create and store the calculation triggers that you create for executing calculations for calculated tags. In the Calculation Triggers node, time triggers are identified with a clock icon, and data triggers with a "X=" icon. Expand the Calculation Triggers node and you will see the pre-existing Trigger Folders: Periodic and Sample Triggers. The Periodic folder contains samples of time triggers, while the Sample Triggers folder contains a sample data trigger.
A time trigger specifies specific times at which the trigger is to fire. When you add a time trigger to a calculated tag, the tag's calculations fire at the times indicated by the time trigger. The calculated tag can have any number of triggers associated with it, but a trigger must be enabled in order to fire. If it is not enabled, it won't fire.
To Create a Time Trigger:
Start the Workbench, then expand your project. Next, expand the Historical Data node to show the Hyper Historian node. Expand the Hyper Historian node to show the Calculation Triggers node.
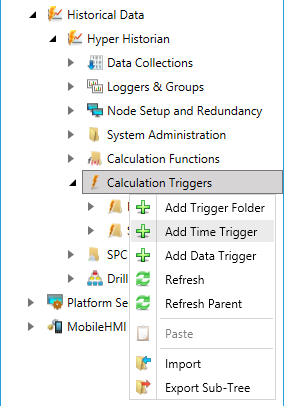
Right-click the Calculation Triggers node in the navigation tree, or any of its sub-nodes, and select Add Time Trigger, as shown in the figure below.
Add Time Trigger in the Project Explorer
-OR-
Select the Calculation Triggers node in the Project Explorer, or any of its sub-nodes, then click on the Add Time Trigger button, shown below, in the Edit section of the Home ribbon in the Workbench.
Add Time Trigger Button

This opens the Time Trigger properties window, shown below, beneath the Project Details section in the Workbench. Enter a name in the Trigger Name text entry field.
Hyper Historian Time Trigger Properties

When you add a data trigger to a calculated tag, the tag's calculations fire when the value of a data point equals a specified value or condition. For example, it can fire when a machine switch gets set to on, or TRUE. A calculated tag can have any number of triggers associated with it, but a trigger must be enabled in order to fire. If it is not enabled, it won't fire.
To Create a Data Trigger:
Start the Workbench, then expand your project. Next, expand the Historical Data node to show the Hyper Historian node. Expand the Hyper Historian node to show the Calculation Triggers node.
Right-click the Calculation Triggers node in the navigation tree, or any of its sub-nodes, and select Add Data Trigger, as shown in the figure below.
Add Data Trigger in the Project Explorer

-OR-
Select the Calculation Triggers node in the Project Explorer, or any of its sub-nodes, then click on the Add Data Trigger button, shown below, in the Edit section of the Home ribbon in the Workbench.
Add Data Trigger Button

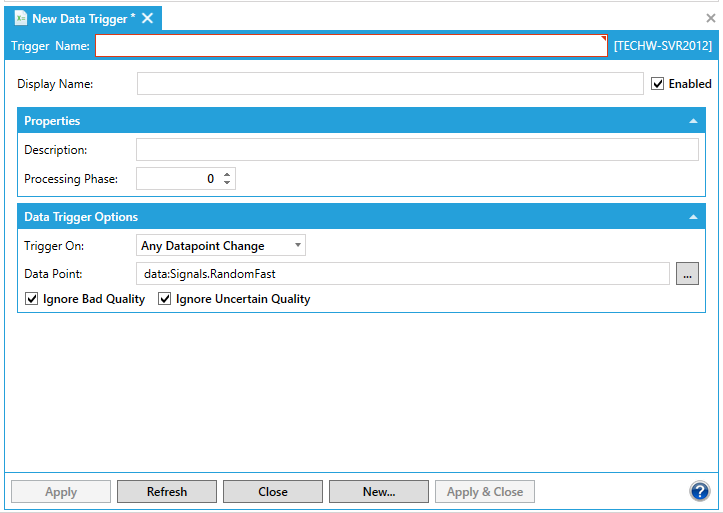
This opens the Data Trigger properties window, shown below, beneath the Project Details section in the Workbench. Enter a name in the Trigger Name text entry field.
Hyper Historian Data Trigger Properties
See Also: