BACnet Configuration Quick Start
Getting started with your BACnet configuration requires the following basic steps:
-
Exploring the Network
-
Check Settings/Create New Items (Port/Device/Object/Property)
-
Creating a Display in GraphWorX64
This topic provides a quick and easy scenario for getting started with a BACnet configuration.
BACnet Configuration via Workbench
- Launch Workbench64 from Start > Programs > ICONICS > Workbench.
- Click the BACnet icon in the Workbench project explorer.
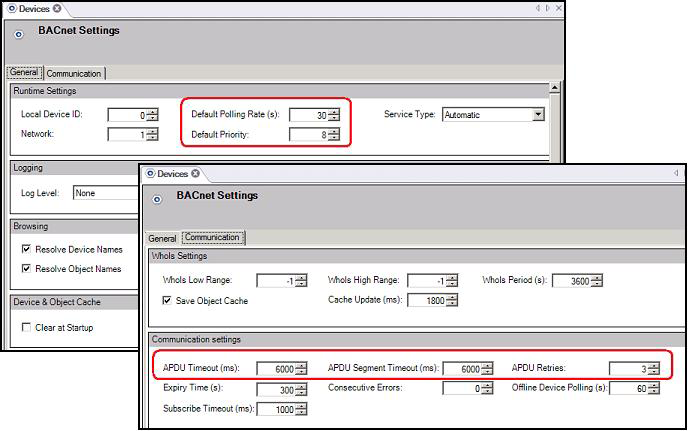
- Once your BACnet configuration opens, you can select Devices by double-clicking on the item, then go to the ‘Communication’ tab, where you will see the setting for your devices.
- Enter the settings for: APDU Timeout, APDU Segment Timeout, and APDU Retries in the ‘Communication’ tab and Default Polling Rate and Default Priority in the ‘General tab’.
BACnet Settings for Devices
- If you made changes click the Apply button.
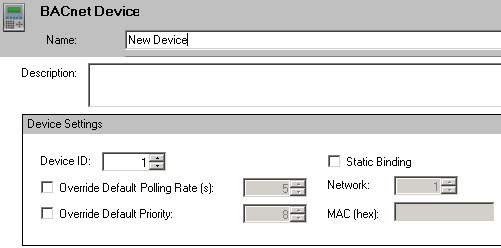
- Now, you need to Add a New Device. Right-click on Devices and choose Device or click the button from the toolbar and select Device. The Device tab will display.
- Type a name in the Name textbox.
- Type a description in the Description textbox, this is optional.
- Type a device ID in the Device ID box.
- You can leave the default polling rate as it is unless you want to override it, then select the ‘Override Default Polling Rate(s)’ checkbox and enter the value in second. Same goes for the Default Priority.
- Enable Static Binding (optional).
- Type a Network number.
- Type a MAC ID.
- Click on the Apply button when you are satisfied with the configuration.
BACnet Device
- Now, you are going to Create a New Object under your device.
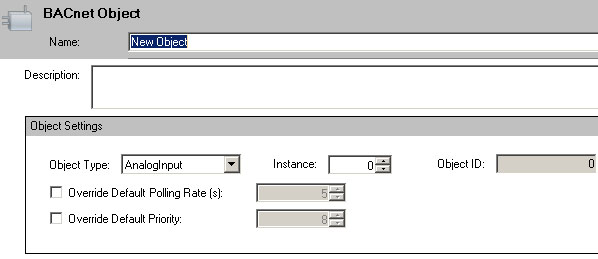
- Right-click on your Device and choose Object or click the button from the toolbar and select Object. The Object tab will display.
- Type a name in the Name textbox and give an option Description.
- Specify the object Type in the Object Type drop-down menu (AnalogInput by default) and specify the right Instance # (usually 1). Object ID should be generated automatically.
- You can leave the default polling rate as it is unless you want to override it, then select the ‘Override Default Polling Rate(s)’ checkbox and enter the value in second.
- Same goes for the Default Priority.
- Click the Apply button.
BACnet Object
- Now, you are going to Create a New Property under your object. Right-click on your Object and choose Property or click the button from the toolbar and select Property. The Property tab will display.
- Type a name in the Name textbox and an optional description in the Description textbox.
- Type a property number in the Property box.
- You can leave the default polling rate as it is unless you want to override it, then select the ‘Override Default Polling Rate(s)’ checkbox and enter the value in second.
- Same goes for the Default Priority and click the Apply button.
BACnet Property

- The last thing you need to do is create a port for your device. Right-click on your Ports (left tree) and choose Port or click the button from the toolbar and select Port. The BACnet Port will come up.
- Type a name in the Name textbox and give an option Description if you wish.
- You can then enter the Channel type, network number, adapter, and the IP settings. Click Apply to confirm.
BACnet Port
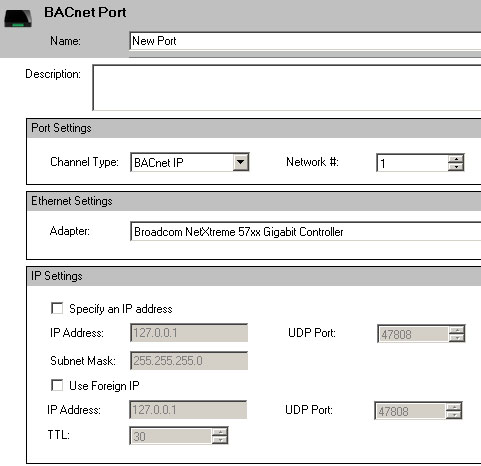
NOTE: Default BACnet communication is based on IP protocol, where default port (47808) can be changed (under the Ports) if you really need it, but in most of the cases you can run with the default settings. Ports in Workbench64 are ICONICS proprietary interfaces created specifically for BACnet communication where IP port is not equal to Workbench64 port.
BACnet in GraphWorX64
In most cases, you would browse directly for the BACnet devices via Data Browser and add BACnet data on your GraphWorX64 display as process points (refer to the Fast Browsing BACnet Devices topic), but in this case, you are going to add BACnet device that you preconfigured in Workbench64. Follow the steps below:
- Start GraphWorX64 from Workbench by clicking on Start > Programs > ICONICS > GENESIS64 > GraphWorX64 > GraphWorX64.
- Workbench launches with a new display. If a display is already open, create a new display by clicking File > New > Display.
- Add a new process point on your GraphWorX64 display and browse for the BACnet data tags under BACnet folder in OPC UA tab.
- When Data Browser shows the objects, browse for your BACnet object property (e.g. presentValue). Select an appropriate input as shown below and then click on “OK.”.
Browsing BACnet Data via Data Browser

- When you have the process point added on your GraphWorX64 display, switch to runtime mode and you will see the BACnet value resolved.
NOTE: BACnet syntax for the point, which has been created via Workbench64 has a different syntax than the one created by Fast Browsing: @bacnet64:Device1\AnalogInput1\presentValue.Value
See also:
Overview of BACnet
BACnet Settings
System Requirements for BACnet
Starting BACnet Connector in Workbench64