Setting a Polling Group within AssetWorX allows users to define set data polling characteristics that can be connected to individual assets (either Equipment or Equipment Classes).
To Add a Polling Group
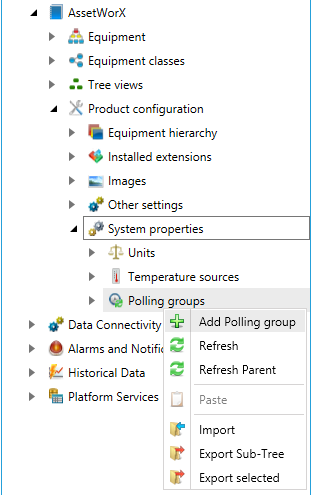
Expand the AssetWorX node, then the Product configuration node, then the System properties node to show the Polling groups node (as shown below).
Right-click on Polling groups and select 'Add Polling group', as shown below.
'Add Polling group' in AssetWorX
-OR-
Select the Polling groups node then click on the Add Polling group button, shown below, in the Edit section of the Home ribbon in Workbench.
Add Polling group Button

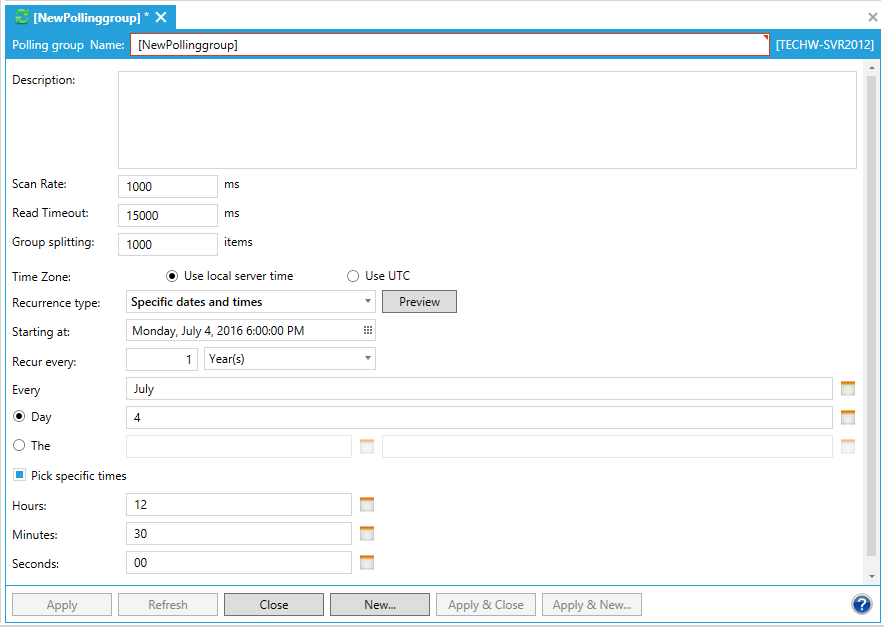
This will open Polling Group properties in the right-side window of the Workbench, as shown below. Enter a name in the Polling group Name text entry field. You can also enter a description for the polling group in the Description text entry field.
Polling Group Properties in AssetWorX
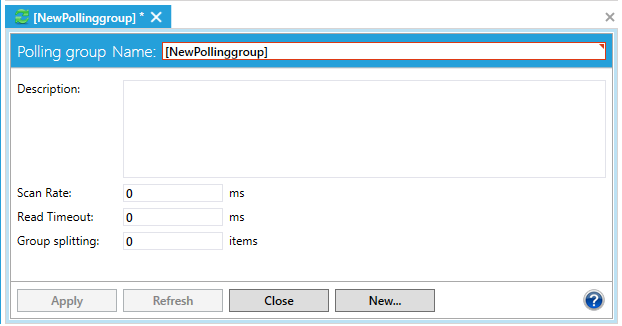
The following remaining options can be set for the polling group:
Scan rate - When the Property is a normal Dynamic Tag, the scan rate is not specified by the configuration. It is specified by the client that connects to the Property. Until a client requests a Property, it is not on scan. When the polling mechanism subscribes (for a brief period) to the polled tag, it will use this Scan Rate. It has not much effect though, as the polling mechanism unsubscribes shortly after receiving the first update. Set in milliseconds.
Read Timeout - How long the polling mechanism waits to get the first (good) value from the input source. Set in milliseconds.
Group splitting - The polling mechanism will subscribe, at a maximum, to this many tags at once, even if more Asset Catalog Properties are in the same polling group.
Recurrence type - The pulldown menu allows you to set the period of recurrence. The options include One time only, Time interval and Specific dates and times. The remainder of the Polling Group properties changes based on what Recurrent type you select.
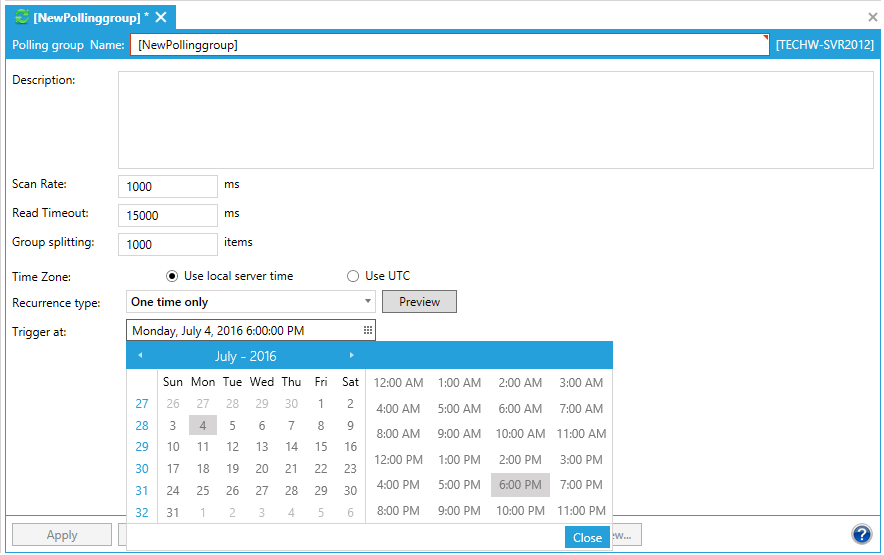
One time only - Once you set the pulldown menu to 'One time only', you'll be able to enter the specific date and time in the 'Trigger at:' field directly or via the calendar tool (by clicking on the ![]() button). Clicking on the
button). Clicking on the ![]() button brings up the calendar tool as shown in the image below. Select your date in the left side and the time in the time in the right side, then click on 'Close' to return to the main Polling Group properties screen.
button brings up the calendar tool as shown in the image below. Select your date in the left side and the time in the time in the right side, then click on 'Close' to return to the main Polling Group properties screen.
'One time only' Settings
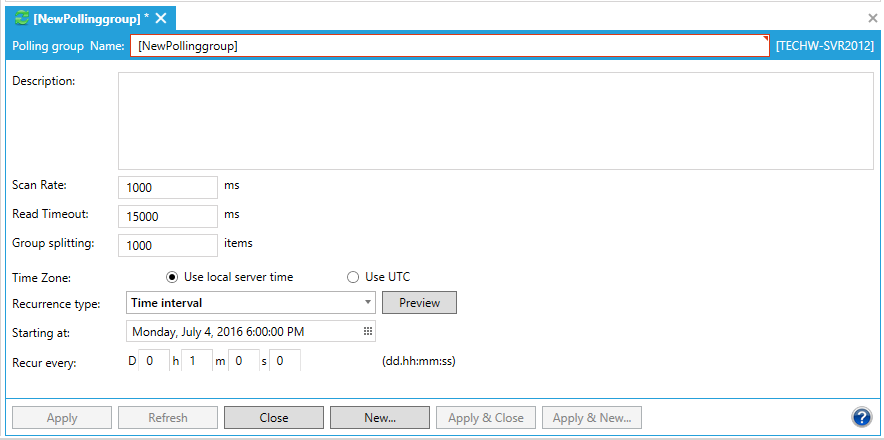
Time interval - Once you set the pulldown menu to 'Interval', you'll be able to enter the specific date and time in the 'Trigger at:' field directly or via the calendar tool (by clicking on the ![]() button), similar to the 'One time only' selection above. You will also be able to set the recurrence period by filling in the 'Recur every:' field. [NOTE: The format of the ‘Recur every’ field is: Day.Hour:Min:Seconds.] Highlight any portion of the time and you can use the up and down arrows to edit in increments.
button), similar to the 'One time only' selection above. You will also be able to set the recurrence period by filling in the 'Recur every:' field. [NOTE: The format of the ‘Recur every’ field is: Day.Hour:Min:Seconds.] Highlight any portion of the time and you can use the up and down arrows to edit in increments.
'Time interval' Settings
Specific dates and times - Once you set the pulldown menu to 'Specific dates and times', you'll be able Once you set the pulldown menu to 'One time only', you'll be able to enter a specific date and time in the 'Starting at:' field directly or via the calendar tool (by clicking on the ![]() button), similar to the 'One time only' selection above.
button), similar to the 'One time only' selection above.
'Specific dates and times' Settings
The remainder of the Polling Group properties changes based on what you select within the 'Recur every:' field. The pulldown allows you to select either Seconds, Minutes, Hours, Days, Weeks, Months or Years.
Seconds - Enter your desired number of seconds.
![]()
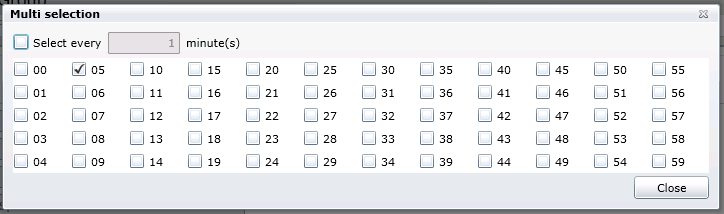
Minutes - Enter your desired number of minutes. OR you can click on the 'Pick specific times' checkbox to enter an additional number of seconds, as shown below.
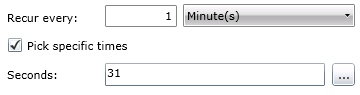
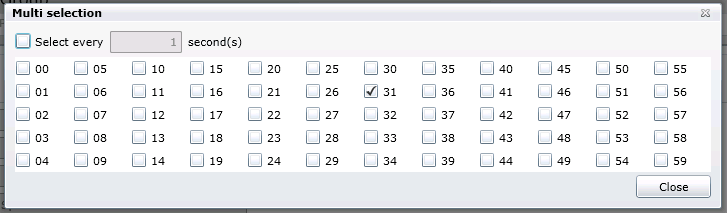
OR, click on the ellipsis button [...] to open the 'Multi selection' window, where you can either click the checkbox next to each second you wish to use or click on the 'Select every ... second(s)' checkbox and enter a range in the text entry field.
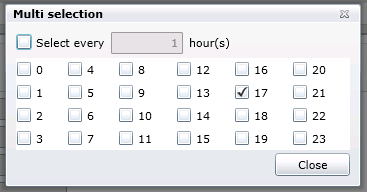
Hours - Enter your desired number of hours. OR you can click on the 'Pick specific times' checkbox to enter an additional number of minutes and/or seconds, as shown below.
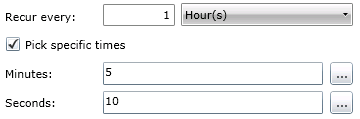
OR, click on the ellipsis button [...] to the right of the Minutes text entry field to open the 'Multi selection' window, where you can either click the checkbox next to each minute you wish to use or click on the 'Select every ... minute(s)' checkbox and enter a range in the text entry field.
You can also click on the ellipsis button [...] to the right of the Seconds text entry field to open an additional 'Multi selection' window, where you can either click the checkbox next to each second you wish to use or click on the 'Select every ... second(s)' checkbox and enter a range in the text entry field.
Days - Enter your desired number of days. OR you can click on the 'Pick specific times' checkbox to enter an additional number of hours and/or minutes and/or seconds, as shown below.
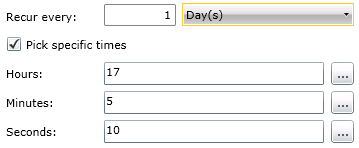
OR, click on the ellipsis button [...] to the right of the Hours text entry field to open the 'Multi selection' window, where you can either click the checkbox next to each hour you wish to use or click on the 'Select every ... minute(s)' checkbox and enter a range in the text entry field.
You can also click on the ellipsis button [...] to the right of the Minutes text entry field to open an additional 'Multi selection' window, where you can either click the checkbox next to each minute you wish to use or click on the 'Select every ... minutes(s)' checkbox and enter a range in the text entry field.
You can also click on the ellipsis button [...] to the right of the Seconds text entry field to open an additional 'Multi selection' window, where you can either click the checkbox next to each second you wish to use or click on the 'Select every ... second(s)' checkbox and enter a range in the text entry field.
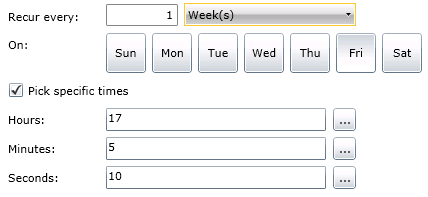
Weeks - Enter your desired number of weeks. You can also set the day of the week for the recurrence. OR you can click on the 'Pick specific times' checkbox to enter an additional number of hours and/or minutes and/or seconds, as shown below.
You can click on the ellipsis button [...] to the right of the Hours text entry field to open the 'Multi selection' window, where you can either click the checkbox next to each hour you wish to use or click on the 'Select every ... minute(s)' checkbox and enter a range in the text entry field.
You can also click on the ellipsis button [...] to the right of the Minutes text entry field to open an additional 'Multi selection' window, where you can either click the checkbox next to each minute you wish to use or click on the 'Select every ... minutes(s)' checkbox and enter a range in the text entry field.
You can also click on the ellipsis button [...] to the right of the Seconds text entry field to open an additional 'Multi selection' window, where you can either click the checkbox next to each second you wish to use or click on the 'Select every ... second(s)' checkbox and enter a range in the text entry field.
Months - Enter your desired number of months.
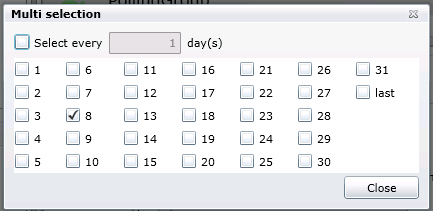
If you click on the 'Day' radio button, you can also enter a specific number of days in the text entry field. If you click on the ellipsis to the right of the Day text entry field, this will open the 'Multi selection' window, where you can either click the checkbox next to each day you wish to use or click on the 'Select every ... day(s)' checkbox and enter a range in the text entry field.
If you click on the 'The' radio button, you can click on the ellipsis to the right of the first text box, which will open the 'Multi selection' window, where you can choose the order of the specific day (e.g. first, second, third, fourth, last).

If you click on the ellipsis to the right of the second text box, this will open the 'Multi selection' window, where you can select a day of the week (e.g. Sunday, Monday, Tuesday, Wednesday, Thursday, Friday, Saturday, Sunday, Week day, Weekend day).

OR you can click on the 'Pick specific times' checkbox to enter an additional number of hours and/or minutes and/or seconds, as shown below.
You can click on the ellipsis button [...] to the right of the Hours text entry field to open the 'Multi selection' window, where you can either click the checkbox next to each hour you wish to use or click on the 'Select every ... minute(s)' checkbox and enter a range in the text entry field.
You can also click on the ellipsis button [...] to the right of the Minutes text entry field to open an additional 'Multi selection' window, where you can either click the checkbox next to each minute you wish to use or click on the 'Select every ... minutes(s)' checkbox and enter a range in the text entry field.
You can also click on the ellipsis button [...] to the right of the Seconds text entry field to open an additional 'Multi selection' window, where you can either click the checkbox next to each second you wish to use or click on the 'Select every ... second(s)' checkbox and enter a range in the text entry field.
Years - Enter your desired number of years.
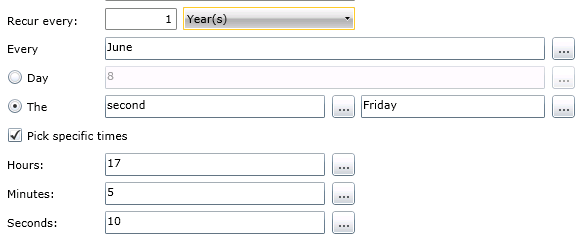
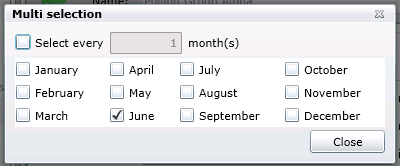
You can enter a month within the 'Every' text entry field. Clicking on the ellipsis button to the right of the 'Every' text entry field will open the 'Multi selection' window, where you can either click on the checkbox next to each month you wish to use or click on the 'Select every ... month(s)' checkox and enter a range in the text entry field.
If you click on the 'Day' radio button, you can also enter a specific number of days in the text entry field. If you click on the ellipsis to the right of the Day text entry field, this will open the 'Multi selection' window, where you can either click the checkbox next to each day you wish to use or click on the 'Select every ... day(s)' checkbox and enter a range in the text entry field.
If you click on the 'The' radio button, you can click on the ellipsis to the right of the first text box, which will open the 'Multi selection' window, where you can choose the order of the specific day (e.g. first, second, third, fourth, last).
If you click on the ellipsis to the right of the second text box, this will open the 'Multi selection' window, where you can select a day of the week (e.g. Sunday, Monday, Tuesday, Wednesday, Thursday, Friday, Saturday, Sunday, Week day, Weekend day).
OR you can click on the 'Pick specific times' checkbox to enter an additional number of hours and/or minutes and/or seconds, as shown below.
You can click on the ellipsis button [...] to the right of the Hours text entry field to open the 'Multi selection' window, where you can either click the checkbox next to each hour you wish to use or click on the 'Select every ... minute(s)' checkbox and enter a range in the text entry field.
You can also click on the ellipsis button [...] to the right of the Minutes text entry field to open an additional 'Multi selection' window, where you can either click the checkbox next to each minute you wish to use or click on the 'Select every ... minutes(s)' checkbox and enter a range in the text entry field.
You can also click on the ellipsis button [...] to the right of the Seconds text entry field to open an additional 'Multi selection' window, where you can either click the checkbox next to each second you wish to use or click on the 'Select every ... second(s)' checkbox and enter a range in the text entry field.
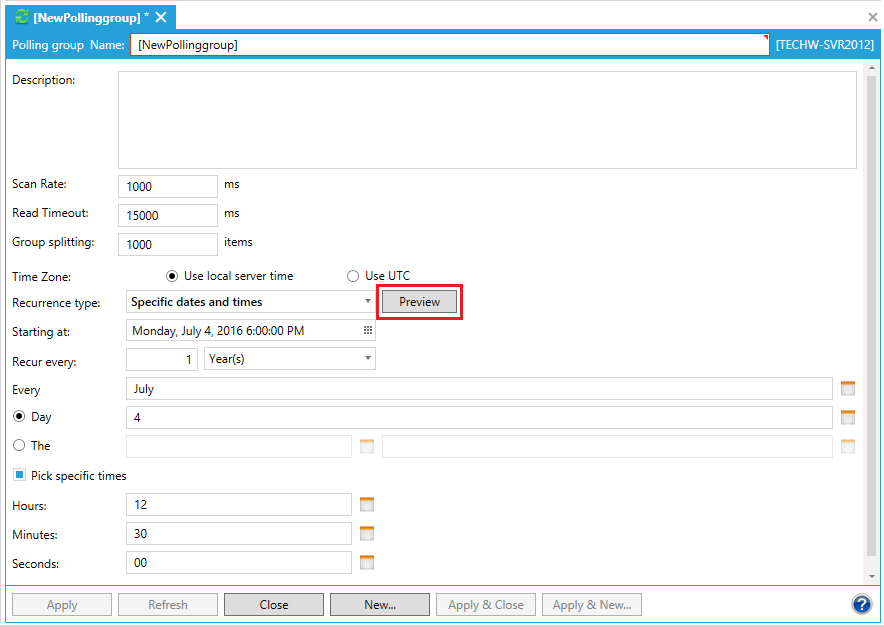
Preview - Once you have set your Polling Group parameters, you can click on the 'Preview' button (highlighted below) to see how the polling will take place according to your settings.
Polling Group Properties
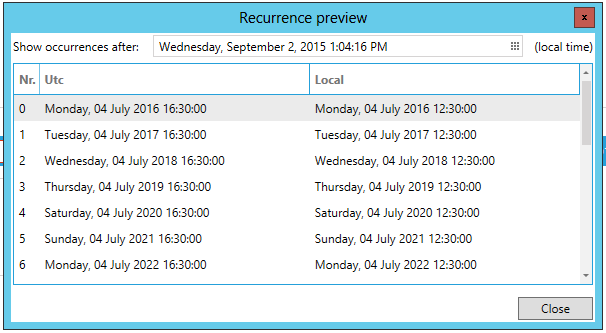
The 'Recurrence preview' window will open. You can click on the calendar button (![]() ) to the right of the 'Show occurrences after:' field to select a new date and time.
) to the right of the 'Show occurrences after:' field to select a new date and time.
Recurrence preview
Recurrences preview with Calendar Selection Tool
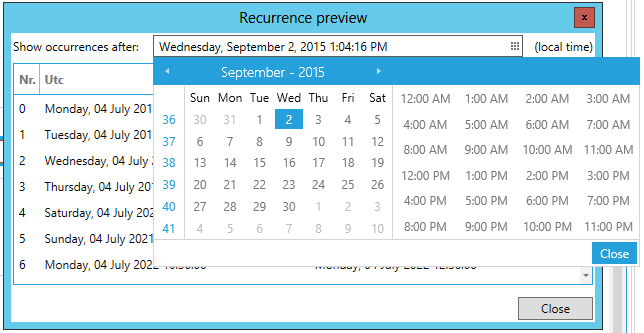
Click on 'Close' to close the calendar selection tool and 'Close' again to close the Recurrence preview and return to the Polling Group properties window.
Click on 'Apply' to save your settings. Click 'Close' to exit the settings.
See Also:
Properties Tab for Equipment Classes