Time Zones
The TrendWorX64 Viewer's Time Zone Synchronization feature allows the user to visualize data from different time zones across the globe as long as they are aligned to the local time. This lets the user compare their values based on the date and time regardless of the location in which the data is recorded. Each Pen can define its own Time Zone in TrendWorX64 Viewer, however, Time Zones defined in the Pen's configuration override the original Time Zone data source. Time Zones can be configured using the Time Zone ID or Time Shift. When using Time Shift, regional time adjustments such as daylight savings time do not apply. Each Time Zone is automatically retrieved from a data source, granted that the data source information is provided before hand.
TrendWorX64 Viewer Requirements:
-
Playback in UTC, local time, device time
-
Device time available for historical data only
-
TrendWorX Viewer implementation
-
Single trend must show data from multiple time zones
-
FDD Viewer/Server implementation
Selecting a Time Zone for your graph:
- Go to your GraphWorX64 page.
- Click the Controls tab.
- Select TrendWorX64 Viewer.
Your cursor becomes a cross hair.
- Click and drag to create a TrendWorX64 Viewer graph.
- Click on your TrendWorX64 Viewer graph to select it.
This opens the Chart tab automatically on your ribbon.
- Click the Time Zone Alignment button within the Data field.

This step is key to ensuring that Time Zones are supported within your project.
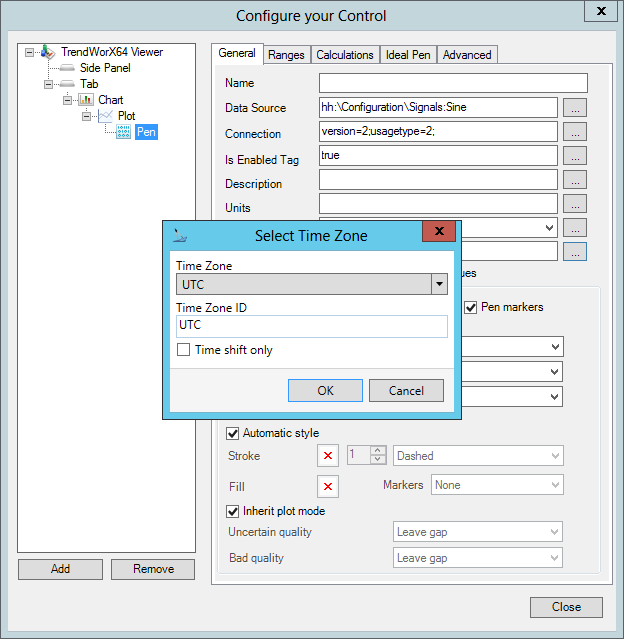
- Double-click your TrendWorX64 Viewer graph to bring up the Configure your Control window.
- Select the Pen option.
- Find the Time Zone field on the General tab. If this is left empty, it will automatically use the value that you will configure later within Hyper Historian.
- Configure the Time Zone field by clicking the Ellipsis to its right.
Then select the Configure option.
- Select the appropriate time zone using the Time Zone field or type it in manually using the Time Zone ID. If these are left empty, the local time is used.
If you want to shift the time by a specific number of hours, you can type it in manually within the Time Zone ID.
You can also use the Data Source name by selecting Browse instead of Configure from the Ellipses to the right of the Time Zone field.
- Click on Runtime at the top right of your GraphWorX64 window. The graph now reflects the new Time Zone.

See Also:
TrendWorX64 Viewer Configuration Ribbon

