Making Copies Using the Multiply Function
The Multiply command is particularly convenient for creating a number of new items such as equipment nodes or equipment classes in AnalytiX Catalog. You can use it to make multiple copies of an item in the Project Explorer. Use it to make three copies or 50 copies or more. In making multiple copies you can enter the formula to be used for populating fields in the copies: you can leave those fields unchanged, or you can specify a number to be appended to those values.
If you are making copies of a node that has a multi-level structure, the entire structure is copied.
Copies will appear above the original item in the same level of the asset tree as the original. The names of copies will have numbers appended to them in accordance with your numbering specifications.
To Use the Multiply Function:
-
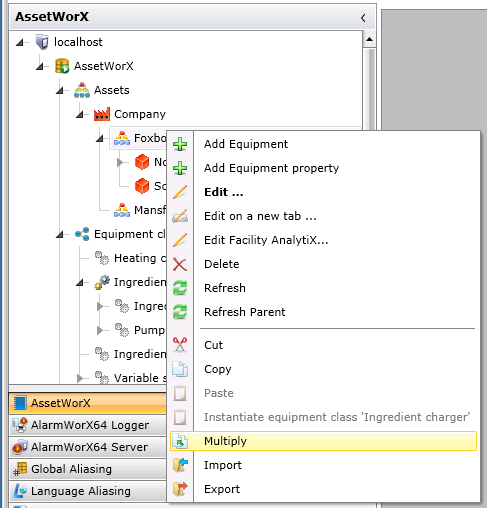
In the Workbench's Project Explorer, right-click the item you want to make copies of. From the pop-up menu, select Multiply, as shown below. (Note that the Multiply function may not be available for all items.)
Selecting Multiply from the Pop-up Menu
-
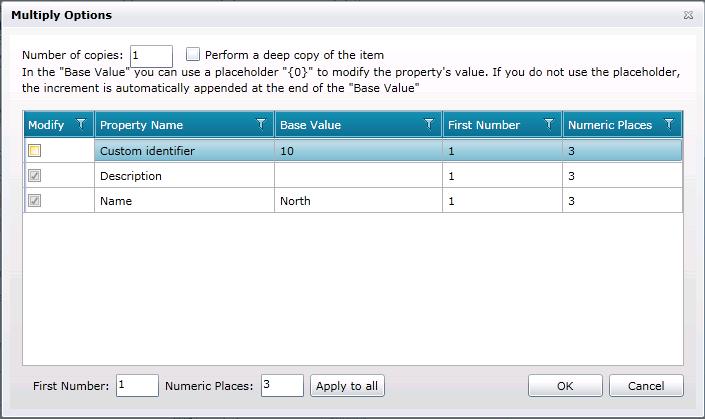
The Multiply Options dialog box appears, and will look something like the following:
Multiply Options Dialog Box
-
In the Number of Copies field, specify the number of copies you are creating.
-
This dialog box lists the properties that you can modify in the copies that are created. The item's properties are listed in the Property Name column, and the properties' values are listed in the Base Value column. If you want the base value to remain unchanged in all copies that are created, remove the check mark from the Modify column. (Note that some properties may be required to change; if they are, you will get an error message when you apply changes.)
-
Change the Base Value of any properties as you wish. If you wish the Base Value to be the incremented number that is generated when the multiples are created, enter {0} as the Base Value. Otherwise, the number will be added as a suffix to the base value.
-
For each property value that will change, in the First Number column specify the first number to be assigned to copies (for example, 100). In the Numeric Places column specify the number of numeric places to be reserved for the numbers that are appended. For example, if you enter 5, then five numeric places will be reserved; if the first number is 100, the first copy's name will be appended with 00100, the second with 00101, the third with 00103, and so on.
Alternatively, you can apply a uniform numbering scheme to all properties that are being modified by entering values in the First Number and Numeric Places fields at the bottom of the dialog box, then clicking the Apply to All button.
-
When you are ready, click the OK button. A progress monitor will appear; when it is done a message will appear at as the last item, as shown below.
Ten Copies

-
If there are errors, you can click the To Clipboard button to copy the displayed messages to the Windows clipboard, then open a text editor and paste them there for later reference.
-
Click Close to complete the process. The copies appear in the Project Explorer.