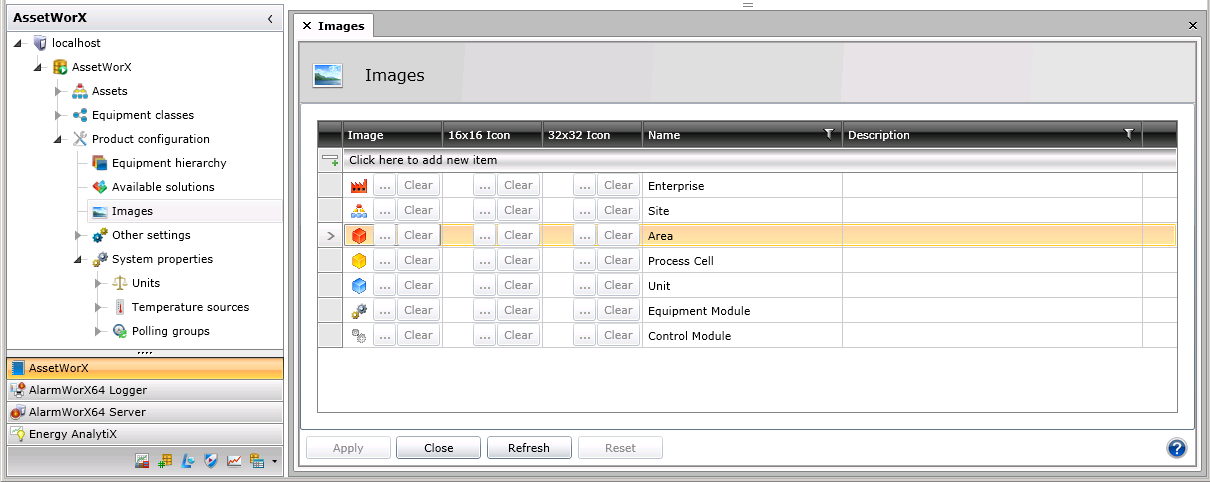
In AssetWorX, the Product Configuration node is where you set your system settings. In the Project Explorer under localhost > [the name of your AssetWorX database. In our examples, we've named it 'AssetWorX'] > Product Configuration, select Images. This displays the Images tab (shown below), which displays the icons that are available for use in tiers of the equipment hierarchy. On this tab, you can add and remove icons that appear in the AssetWorX's asset tree. Steps for using this tab are provided in the Configuring icons for the equipment hierarchy topic. Icon images must be saved in .jpg or .png format. Once you have configured an image, you can go to the Equipment Hierarchy node and put it to use in a tier of the hierarchy.
Images Tab
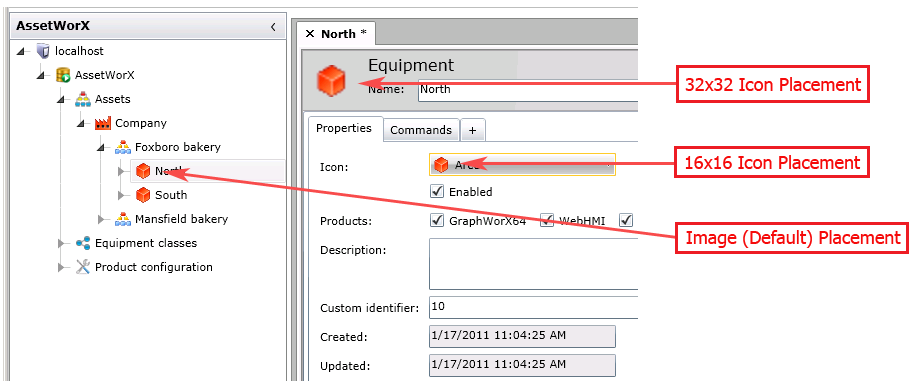
You can configure up to three versions of an icon image for use in AssetWorX. You must provide a default image file, which appears in the asset tree. You can also optionally provide a 16-pixel by 16-pixel version of the icon that appears in drop-down lists where users choose an icon, and a 32-pixel by 32-pixel version of the icon that appears in heading area of the Equipment tab. If you don't provide the two latter versions, the default version is used instead, as in the illustration below.
Three Placements for the Icon Image
Options on the Images tab are:
Image: The icon as you want it to appear in the asset tree. Click the ellipsis button [...] to display the Open dialog box where you can navigate to and select the .jpg or .png file name. Clicking Clear removes the file from the configuration.
16x16 Icon: The same icon sized at 16 pixels by 16 pixels which will appear in drop-down lists where users choose an icon. If you don't provide a version in this cell, the default version in the Image column is used in drop-down lists instead. Click the ellipsis button [...] to display the Open dialog box where you can navigate to and select the .jpg or .png file name. Clicking Clear removes the file from the configuration.
32x32 Icon: The same icon sized at 32 pixels by 32 pixels which will appear in the heading area of the Equipment tab. If you don't provide a version in this cell, the default version in the Image column is used in the Equipment tab instead. Click the ellipsis button [...] to display the Open dialog box where you can navigate to and select the .jpg or .png file name. Clicking Clear removes the file from the configuration.
Name: The name of the icon or the tier where it is intended for use. This field is for informational purposes only.
Description: A description of the icon, or other informational or instructive text regarding the icon.
Click here to add new item: Click this row to configure another icon image for use in the equipment hierarchy.
Other tips to help you use this tab:
To add another row, either click on an existing row or click Apply to save all changes. This enables the Click Here to Add New Item field.
To delete an entire row, select the row so that the entire row is selected (not just one field), and press the Delete key.
If at any time you believe the values to be out of sync with stored values in the database, you can click the Refresh button to retrieve the most-current values.
At any time, you can click the Reset button to undo changes that you haven't saved yet.
See also:
Configuring icons for the equipment hierarchy
Defining tiers for the equipment hierarchy