This Help topic provides an introduction to using KPIWorX on your Apple Watch. Required hardware includes an Apple Watch Series 2 or later, as well as an iPhone compatible with your Apple Watch. The suggested procedures and settings that follow also require an amount of familiarity with ICONICS KPIWorX.
You can view KPIs on your wrist using the KPIWorX app and your Apple Watch. Apple Watch support requires the setup of security and OAuth 2.0 authentication. This application note will walk you through the required setup of security, your KPIWorX dashboard, and the KPIWorX app to see KPIs on your wrist.
Apple Watch support requires security to be enabled, and for there to be at least one user configured. If you do not currently use security the following section will walk you through the bare minimum steps to configure a user to use with Apple Watch support. It will otherwise behave as if security were not enabled on your system.
These steps are designed for demonstration purposes only. ICONICS highly recommends that these steps not be used on production systems. Instead of following these steps, consult the GENESIS64 Security – Quick Start application note and the help files to properly secure your system.
Open Workbench.
Expand Security.
Open Global Settings.
Set Security Active to Testing.
Note: Testing mode applies permissions when a user is logged in, but when no user is logged in all permissions are allowed, similar to when security is inactive. This mode is for testing only. Remember to set Security active to Active before putting a production system live!
Right-click on Users and add a new user.
Give this user a name you will remember and apply your changes.
A Please specify a password dialog will open. Give this user a password you will remember.
Note: If you forget this user's password at a later date, you can right-click on the user in Workbench and select Change Password.
Open Global Settings and ensure that security is active.
You should now have a system with a single user; however, you should be able to use Workbench and the rest of your system without logging in as that user. We will use the user we added later to log into the KPIWorX iPhone app.
On a system that already has security configured, the user used to log into the KPIWorX app must have at minimum these security rights:
Stations tab: All stations allowed (asterisk in the allow section). (Alternately, the IP address of the phone can be used, but this often fails to match due to network settings. The phone name cannot be used.)
Points tab: Read access to the data sources that will be used in the watch screens.
Open Workbench, if it is not already running.
Expand Security.
Right-click on OIDC Relying Parties and add a new OIDC relaying party.
Name this new party, KPIWorX.
Verify that the Enabled box is checked.
In the Login section, uncheck Require client secret.
Check Require PKCE.
For both the Redirect URIs (Login section) and Post Logout Redirect (Logout section), fill in this URI:
com.iconics.kpix://oauth/
In the Refresh token section, allow refresh tokens.
Apply your changes.
In the Workbench tree, go to Security > General Settings.
Go to the Web Login tab.
Check the Enabled box and apply your changes.
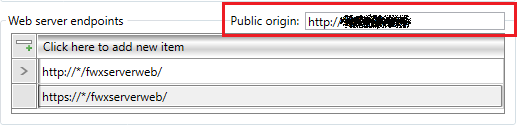
If you are planning on using an IP address instead of a fully qualified domain name for your KPIWorX pages, follow these steps:
Go to File > Platform Services Configuration.
Go to the Basic tab.
Enter your IP address into the Public Origin field in this format: http://ip address or https://ip address.
Enter Web Server Endpoints
Apply your changes.
Restart the ICONICS FrameWorX (IcoFWXServer) service.
Start the ICONICS Web API Service (IcoWebAPIService) if it is not already running. If this is a production system where you plan to use the KPIWorX Apple Watch support on a regular basis you may want to set the startup type of this service to Automatic or Automatic (Delayed) so that it will start automatically after the server is restarted.
The set of widgets available to view on your watch is referred to as a deck. A KPIWorX dashboard can have an associated watch deck. The deck is designed to be the watch version of the KPIWorX dashboard.
A watch deck shares the global filters configured on its associated dashboard.
Note: At this time, there is no way to automatically configure a watch deck from a dashboard or link the data sources of a dashboard with its associated deck, but we are planning to more closely relate the dashboard with its watch deck in the future.
To Create a Watch Deck, Follow These Steps:
Open KPIWorX by using one of these methods:
Open an HTML5-compliant browser and go to http://localhost/AnyGlass/projects/kpiworx/default.kpix (replace "localhost" with your IP address or server name if configuring from a remote machine).
Launch the KPIWorX app on your desktop or tablet.
If you would like to make a watch version of an existing dashboard, open that dashboard. Otherwise, create a new dashboard.
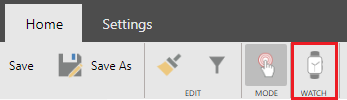
Select the Watch icon on the Home menu.
Selecting the Watch Icon
Select a component from the component library. You should see that widget load on your watch face.
Drag data sources from the Tag Browser into the data sources in the Widget Settings panel to map the data to your widget. You can also drop the tag directly on the widget, which will populate the first empty data source field.
Note: Currently, the chart widgets for the watch will not animate except on an actual watch. We plan to support live previews of the watch widgets in future versions.
If desired, use the blue plus icon below the watch to add more watch screens to your deck. Use the red X icon to remove watch screens.
To reorder your screens, add a blank page where you would like the new screen to go, then drag the widget from the old screen to the new. You may delete the empty page left behind.
If desired, you can associate your dashboard and deck with a geographical location. To do this, go to the Settings menu and select Location. You can select the position icon to automatically select your current location, zoom and pan around the map and right-click your desired location, or type in the latitude and longitude coordinates. Select the red X icon to remove the current location. Click outside the map area when finished.
When you are satisfied with your deck, select Save or Save As in the Home menu. Give the dashboard a name and select Ok.
Launch the KPIWorX app on your iPhone.
Tap on the Server field.
Use the plus button to add a new server.
Enter your server host name or IP address. Make sure to start the name with http:// or https://.
Note: If you are using an IP address, make sure to use the same URI as you entered in the Public origin field of Platform Services Configuration.
If desired, enable Default Server. This will bypass the server connection screen for future sessions, bringing you directly to your default server.
Select Done.
Tap the server you just created.
Tap the Settings gear in the upper left corner.
In the Watches section, tap User.
Tap Login.
Enter the username and password of a user configured in ICONICS security, then tap Sign in.
Select Grant Access.
Note: The login screen may say you are logged in as an anonymous user. This is normal.
At this point, you should be ready to use the watch app. When launched, it will connect to the server selected on the home page of the app using the credentials you selected.
Optionally, you can go back to the home page and use the Connect button to connect to KPIWorX, but this is not required to use the watch.
After the KPIWorX app is successfully connected from your phone, push the crown on your Apple Watch, and tap the icon for the KPIWorX app.
The app may take a moment to load, then you should see a list of KPIWorX decks you have configured. If you picked locations for your decks, the list will be sorted by distance, with the closest decks listed first.
List of Configured Decks on Apple Watch

To refresh the list of decks, use 3D touch to bring up the context menu, then select Refresh.
Tap a deck. The first widget in your deck will load. To navigate between widgets, swipe left or right. To go back to the list of decks, hit Cancel.
Chart widgets can have a cursor. Tap the screen of a chart widget to bring up the cursor and use the crown to move the cursor. Information about the cursor position, such as the label and value of a bar or pie slice, will be shown above the chart.
Chart Widget Example
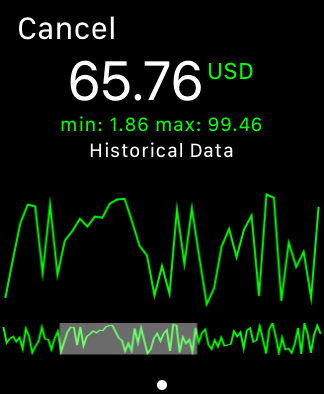
The crown can do several things on the trend widget. One tap activates the standard cursor. A second tap will activate the summary, allowing you to use the crown to scroll back and forth along the summary. A third tap will activate the summary size, allowing you to use the crown to resize the summary window.
Data is refreshed on the screens every 20 seconds, though a refresh can be forced sooner by using 3D touch to bring up the context menu.
See Also: