GENESIS64 allows you to view displays over the intranet or internet in Internet Explorer. In order to take advantage of this capability, you will need to publish your displays. This document will walk you through the necessary steps to set up your machine to publish your displays using FTP.
NOTE: To publish via HTTP instead, see the application note entitled, “GraphWorX64 - Publishing Displays Using the HTTP Channel”.
The steps to install the FTP Service are slightly different depending on the operating system you are using.
Installing FTP on Windows Server 2012
Open the Server Manager.
On the left, select Local Server.
Scroll down to Roles and Features, then go to Tasks -> Add Roles and Features.
Click Next to the introductory page, then select “Role-based or feature-based installation” and click Next.
Choose “Select a server from the server pool” and make sure your local machine is selected, then click Next.
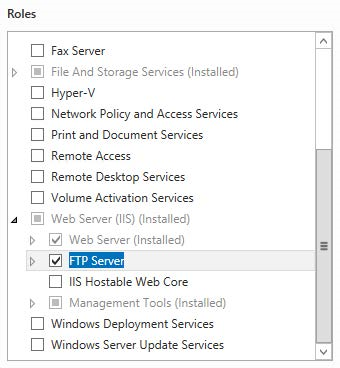
If it is not already checked, check “Web Server (IIS)”.
Expand Web Server (IIS) and check “FTP Server”, then click Next.
Figure 1 - FTP Server Role
Click Next again on the Features page.
On the confirmation page, click Install.
Installing FTP on Windows Server 2008 or Windows Server 2008 R2
Open the Server Manager.
Scroll down to find Roles Summary to check that you have the Web Server (IIS) role listed.
Figure 2 - Web Server (IIS) Role

If you have this role as shown in Figure 2, skip to step 6, if not, click the Add Roles link to bring up the Add Roles Wizard.
In the Wizard, select Server Roles on the left hand side, and check the Web Server (IIS) and follow through the dialog to complete the IIS installation.
You should now be in the Server Manager MMC again.
Expand Roles in the tree and select Web Server (IIS).
Scroll down to find the Role Services Section and click the Add Role Services link.
Figure 3 - Web Server Role Services
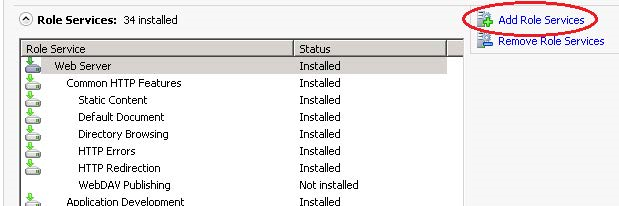
In the Select Role Service dialog, scroll down to the bottom and check the FTP Server or FTP Publishing Service option. Click Next and follow through the dialog to install your FTP Service.
Your FTP service should now be installed.
Installing FTP on Windows 10, Windows 8, or Windows 7
Open the Control Panel and select Programs and Features.
In the Programs and Features dialog, select the Turn Windows Feature on or off option on the left hand side.
In the Windows Features dialog, check the Internet Information Services option if it’s not already checked.
Expand Internet Information Services and check FTP Server.
Click OK and follow the installation dialog to finish installing the FTP service.
Once you have successfully installed your FTP service, open an Internet Information Services (IIS) Manager from Control Panel -> Administrative Tools.
NOTE: If you have two IIS Managers, please use the one with no version as it is usually the latest version that we want to use.
Expand your local computer and Sites. If you already have an FTP site configured, skip to step 5. If you don’t have an FTP site, you can create one by right-clicking on Sites and select Add FTP Site. Give the FTP site a name (usually “Default FTP Site”). For the physical path, choose C:\inetpub\wwwroot. Click Next.
For the Binding and SSL settings, leave the IP address as “All Unassigned” and the port to 21. Check “Start FTP Site Automatically”, and set it to “No SSL”. Click Next.
Figure 4 –Binding and SSL Settings

In the Authentication, check Basic. Set the Authorization to All Users, and allow Read and Write permissions. Click Finish.
NOTE: If desired, choose a more restrictive authorization method. This can be changed later, but for testing purposes it is easier to configure the authentication for all now and restrict it later once you’ve confirmed that the publishing works.
Figure 5 – Authentication and Authorization Information

Now we need to create a Virtual Directory: Right-click on your newly created FTP site and select Add Virtual Directory…
Name the virtual directory “PubDisplay” and choose C:\Program Files\ICONICS\GENESIS64\WebSites\PubDisplay for the physical path.
Click Test Settings… to make sure you can connect.
NOTE: If you have trouble connecting you can use the “Connect as” button to specify a user that has access to the GENESIS64 folder, but this is less secure than the default pass-through authentication.
Click OK to finish after test is successful. You should now see your virtual directory listed under your FTP Site.
Figure 6 - Virtual Directory

Right-click your Default FTP Site then go to Manage FTP Site. If it’s stopped, start it. You may want to set the FTP Service to automatically start in the future.
NOTE: You may need to restart IIS for these changes to take effect. To do so- run command prompt as administrator and type “iisreset servername” (without quotes) where servername is the name of the server you are configuring ftp publishing on.
You are now ready to publish your display. Open GraphWorX64, then go to File -> Publish.
In the Web Publishing Wizard, click Next.
In the Publishing Options screen, select the settings that you would like to publish. You can also check Use Advanced MultiFormat Options if you would like to publish multiple instances of the displays in different formats.
Select the files you wish to publish, if it is not already selected. You may add files by clicking the add/remove files button, clicking add files, and browsing to the files you would like to publish. If you do not already have a file, you can choose one from the GenDemo directory. Click Next to proceed.
The publishing wizard will collect all of the files that need to be processed. If there are any files you do not want to publish, uncheck them, and then click Next.
In the select a web server dialog, click the New… button to create a new server to publish our displays.
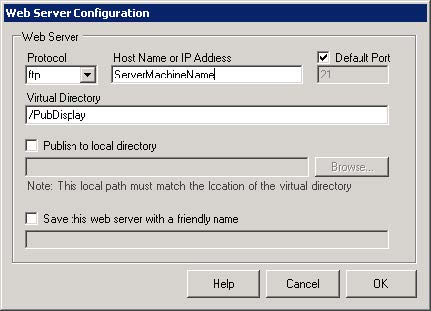
In the Web Server Configuration dialog, change the protocol to FTP and enter your host name or IP address for the web server.
In the Virtual Directory text box, we can enter “/PubDisplay”, which should be there by default.
NOTE: You can check the ‘Save this web server with a friendly name’ option if you wish. This allows it to display a friendly name for this connection instead of the connection path.
Your finished Web Service Configuration should look similar to Figure 5.
Figure 7 - Web Server Configuration
Click OK to return to the Web Publishing Wizard and click Next to continue.
Enter the name and password of a user who has write access to the FTP folder. (A user who is a local administrator should have access.) If desired, check the “Remember my Password and User name” box.
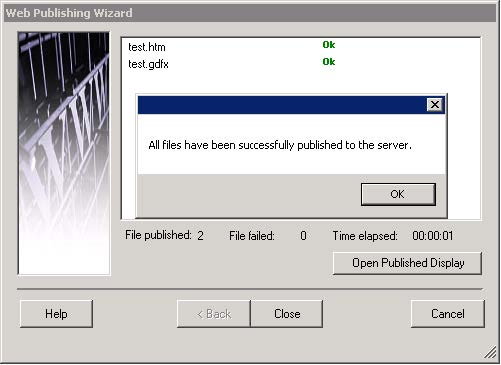
Click Publish to start publishing your files. You should get a summary of the files status. Click the “Open Published Display” button to launch Internet Explorer to view your published page.
Figure 8 – Publishing Completed
NOTE: Please notice that published display will be located in the following folder by default:
C:\Program Files\ICONICS\GENESIS64\WebSites\PubDisplay.
Please see the application note entitled, “GENESIS64 - Running in Internet Explorer”, for more information on how to set up your Internet Explorer clients.
See Also:
Publishing Display Files to a Web Server