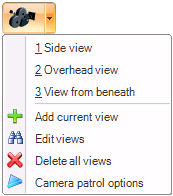
Drop down the Camera button list in the Home ribbon's View section, then select Camera Patrol Options from the menu. The Camera Animation Options dialog box appears.
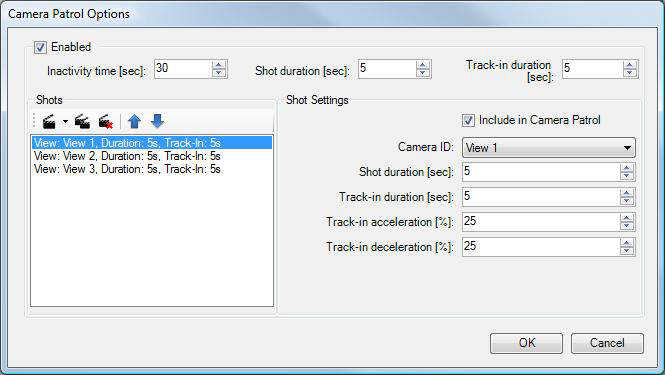
Select ![]() the Enabled check box to set up a camera patrol that automatically walks through the views during runtime. In runtime, after the user is inactive for a specified period of time (that is, the number of seconds you specify in the Inactivity Time field), the camera patrol will automatically cycle through the views in sequence.
the Enabled check box to set up a camera patrol that automatically walks through the views during runtime. In runtime, after the user is inactive for a specified period of time (that is, the number of seconds you specify in the Inactivity Time field), the camera patrol will automatically cycle through the views in sequence.
At the top of the dialog box, set up global default values for the views you will be adding to the camera patrol:
-
In the Inactivity Time box, specify the number of seconds of inactivity that is to pass before the sequence begins. If you want the sequence to begin immediately, enter 1. The default is 30.
-
The Shot Duration field at the top of the dialog box specifies the default number of seconds that the camera will pause at each shot. The length of time is determined by the purpose of the shot and what runtime users will be expected to do, if anything, with the shot. You can override this value for each shot.
-
The Track-in Duration field at the top of the dialog box determines the default number of seconds it takes for the camera to move from one shot to the next. The number of seconds you enter will be determined by the size of the scene in which users will be maneuvering and how long it takes graphics to load. You can experiment with this number to achieve an optimum number of seconds. If you don’t want any animation between views, change the number of seconds to 0 (zero). You can override this value for each shot.
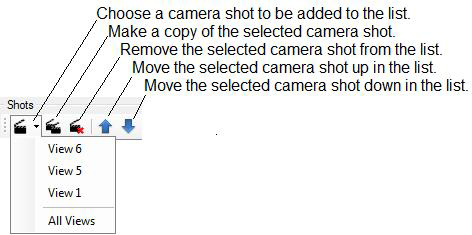
In the Shots box, use the icons to add the views to be included in the camera patrol. You can add selected shots, or add them all. You can also reuse a shot in the sequence by duplicating it and then moving the shot to an appropriate spot in the sequence.
Set up shot settings for each shot:
-
Select the shot in the Shots box.
-
In the Shot Settings box:
-
A checkmark
 in the Include in Camera Patrol checkbox includes the shot in the camera patrol. To remove it, uncheck
  this checkbox. This lets you keep a shot's configuration, even if you don't want it included in the camera patrol.
 -
The Camera ID shows the shot you are defining. You can choose a different shot from the drop-down list.
-
The Shot Duration field specifies the number of seconds that the camera will pause at the shot. The length of time is determined by the purpose of the shot and what runtime users will be expected to do, if anything, with the shot.
-
The Track-in Duration field determines the number of seconds it takes for the camera to move to this shot. The number of seconds you enter will be determined by the size of the scene and how long it takes graphics to load. You can experiment with this number to achieve an optimum number of seconds. If you don’t want any animation leading into this shot, change the number of seconds to 0 (zero).
-
In the Track-in Acceleration [%] field, specify the percentage by which the camera animation leading up to this shot accelerates or speeds up as it leaves the prior shot. The default is 25%. To maintain a constant speed, enter 0.
-
In the Track-in Deceleration [%] field, specify the percentage by which the camera animation leading up to this shot decelerates or slows down as it approaches this shot. The default is 25%. To maintain a constant speed, enter 0.
-
-
Repeat for each shot.
If you don't want the set of camera shots to be made available at runtime, uncheck ![]() the Enabled checkbox. You can always return later to enable the camera shots.
the Enabled checkbox. You can always return later to enable the camera shots.
Click the OK button.
