2D Controls Quick Start
In addition to the existing viewer controls, GraphWorX64 has controls that can help simplify what can be a tedious process and drastically reduce development time. These controls are called the scale control and the pipe control.
Figure 1 - Controls Ribbon Highlighting the Scale and Pipe Controls

This topic covers the basic functionality and some useful tips for these two controls.
Some of the more difficult aspects of designing a gauge or scale can include evenly spacing the tick marks, adjusting the numbering, and creating a precise arc if necessary. With the use of the Scale Control, these hurdles no longer apply. Let's explore the Scale Control using an example:
- Open a GraphWorX64 Display from Start -> Programs -> ICONICS GENESIS64 -> GraphWorX64 -> GraphWorX64.
- Select Controls and then the Scale Control.
- Click and drag anywhere on the display to create a new Scale Control.
NOTE: Depending on the overall shape of the rectangle you drew to create the Scale Control, it will have either created a Vertical Scale Type if you drew a tall rectangle, Horizontal Scale Type if you drew a wide rectangle, and Radial Scale Type if you drew a square shaped rectangle. The Scale Type can be changed at any time after creation.
- If it is not already a Vertical Scale Type, you may do so by going to the changing the ScaleType property to Vertical. Notice that when you resize the Scale Control all of the Tick marks remain proportional.
- In the properties of the Scale Control, change the MajorDivisions property, located in the Scale category, from 5 to 10.
- Draw a Polygon to represent an arrow and place it to the right of the scale. Give it some color if you wish.
- Add a Location Dynamic the Polygon so that it starts at the bottom and ends at the top of the scale as shown in Figure 2.
Figure 2 - Scale Control and polygon with Location Dynamic
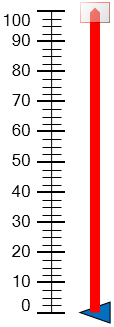
- Set the DataSource of the new Location Dynamic to localsim:ramp
- Enter Runtime mode and view the arrow move up the scale as it corresponds to the ramp simulation signal.
For complete information, refer to the Scale Controls topic.
Similar to the Scale Control, the Pipe Control makes the task of designing a unified pipe system including joints and end caps.
- Open a GraphWorX64 Display from Start -> Programs -> ICONICS GENESIS64 -> GraphWorX64 -> GraphWorX64.
- Select Controls and then the Pipe Control.
- Click and drag anywhere on the display to create a new Scale Control.
NOTE: Depending on the overall shape of the rectangle you drew to create the Pipe Control, it will have either created a Vertical Pipe if you drew a tall rectangle, and Horizontal Pipe if you drew a wide rectangle. The orientation can be changed once it has been created.
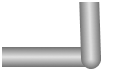
- Double-click on your new Pipe Control and you will see a red line with a white box at the beginning and end of the pipe as shown in Figure 3.
Figure 3 - Editing the Pipe Control's Vertices

- You should now able to add new vertices by clicking anywhere along the red line and dragging the new vertex as needed. This behaves very similar to the location dynamic.
- After you have created some additional vertices, you can see how smooth they blend together to form one pipe.
- Go to the properties of the Pipe Control. In the Pipe category, change the CapType from flat to Round. The ends should now have rounded tips. Placing a Pipe Control below this one can give off the impression that the top one bends into the bottom one.
Figure 4 - Rounded end pipe on top of another
- Place an Ellipse object on one end of the pipe.
- Add a Location Dynamic to the new Ellipse object. You do not need to specify a path at this time.
- Select the Ellipse and then the Pipe Control using the Shift key and selecting them from the Object Explorer or display.
- Right-click on them and you will see a Copy Path To Dynamic Location option.
- It may not be apparent at this time what has just occurred, but if you select the Ellipse’s Location Dynamic and click Edit Dynamic On-Screen at the bottom of the properties window you will see something similar to Figure 5.
Figure 5 - Location Dynamic Mapped to Path of the Pipe Control
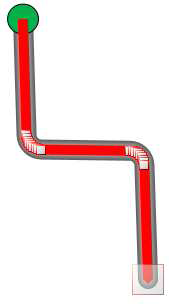
- The path of the Location Dynamic was automatically set to follow the same path of the Pipe Control.
- Set the DataSource of this Location Dynamic to localsim:ramp
- Enter Runtime mode and watch the Ellipse move along the path of the Pipe Control.
For complete information, refer to the Pipe Control topic.