The Channels node within the Modbus Configurator provider in the Workbench allows you to set a new channel where you can set the Channel Type of Modbus TCP/IP Ethernet. The selected Channel Type will automatically change the list of properties to complete. Set Channels can then be selected from within Device properties.
To Add a New Channel
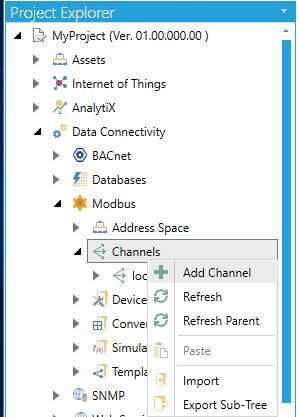
From the Project Explorer, click on Channels, then Add Channel, as shown below.
New Channel from the Tree Explorer

-OR-
Select the Channels node in the Project Explorer, then click on the Add Channel button (shown below) in the Edit section of the Home ribbon in the Workbench.
Add Channel Button

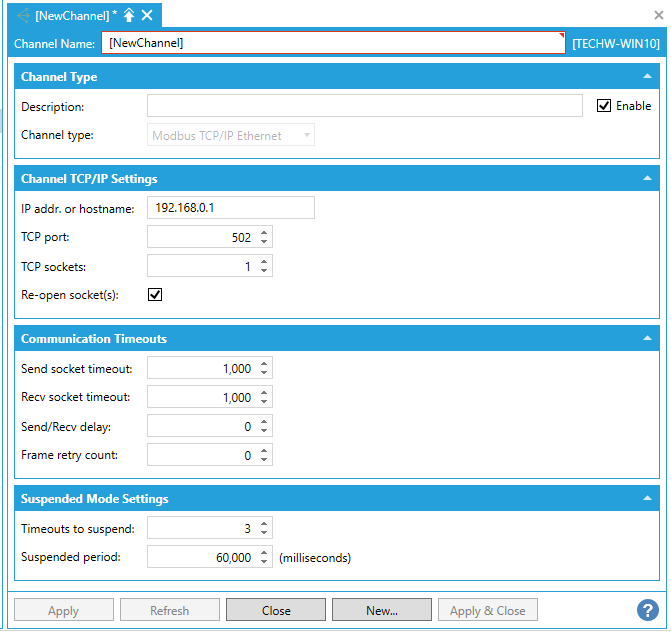
This opens the New Channel properties in the right side of the configurator, as shown below.
Configuring a New Channel [Modbus TCP/IP Ethernet Channel Type Selected]

Description - Enter a description of the channel here, in order to differentiate it from any additional channel.
Enable - Click this checkbox to enable the channel.
Channel Type - Use the pulldown menu to select Modbus TCP/IP Ethernet. The remainder of the properties to complete will update according to the selection.
Modbus TCP/IP Ethernet Channel Type Selected

IP addr. or hostname - Enter the IP address or hostname in the text entry field.
TCP port - Enter the TCP port number in the text entry field.
TCP sockets - Enter the TCP sockets in the text entry field.
Re-open socket(s) - Click this checkbox to close and reopen the TCP socket(s) when a timeout is detected.
Send socket timeout - Enter the duration of the timeout in the text entry field.
Recv socket timeout - Enter the duration of the timeout in the text entry field.
Send/Recv delay - Enter the send/receive delay in the text entry field.
Frame retry count - Enter the retry count in the text entry field.
Timeouts to suspend - Enter the number of timeouts to suspend in the text entry field.
Suspended period - Enter the amount of time in the text entry field (in milliseconds) for the suspended period.
Once you have completed making your settings, click on the Apply (or Apply & Close) button to save your changes and return to the Workbench.
See Also: