The CFSWorX solution empowers an organization to alert the right field worker to respond to equipment service needs. It is built upon ICONICS real-time field equipment monitoring technologies. Worker availability and location are monitored and used in the customizable workflows when determining the best worker(s) to notify for a given event. CFSWorX monitors field worker responses and maintains an audit trail.
Field Workers may be defined directly in CFSWorX or imported from other sources. Currently Active Directory and Microsoft Dynamics 365 are supported. Other sources are planned for future updates. Field workers can be organized into groups to ensure that the right experts are notified for an issue. Workers can also be assigned responsibility for alarms, alarm areas, or assets, which can be used to notify the right worker. Contact information for each worker (email or phone number) can be defined to be used for email, SMS, or other communications.
This section will describe how to add a local CFSWorX user with an email address.
For information about importing workers and groups from Active Directory or Dynamics 365, please see the product help.
Open Workbench.
Go to Connected Field Worker > Field Workers > Local-Default.
Add a user to Local-Default.
Give the user a name.
On the General tab, specify the Security Name for the user. This is required if you will be using the Mobile Device Health feature or acknowledgement via SMS.
Note: See the application notes, CFSWorX - Setting up Mobile Device Health for details on using Mobile Device Health feature, and CFSWorX - SMS Configuration for instructions on how to Acknowledge via SMS.
On the Email tab, add an email address to the list.
Apply the changes.
Templates are used to determine what actions are taken for each triggering event. There are different blocks for templates based on different actions for CFSWorX. CFSWorX templates use the same workflow engine as Workflows and BridgeWorX64.
The sample CFSWorX configuration database includes an example template that we will use for our demonstration.
Open Workbench.
Go to Connected Field Worker > Templates.
Edit Ack Loop Template.
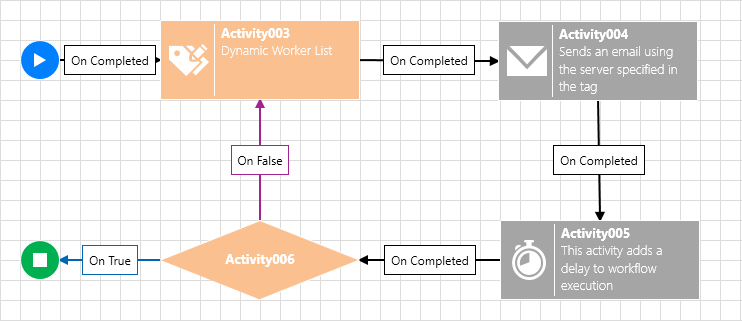
The Ack Loop template reads from a Dynamic Worker List and sends an email to each worker on the list. After this it waits 1 second and checks if the triggering alarm was acknowledged. If not, then it will continue to send emails to the worker list. Execution stops on either on acknowledgment of the alarm or completion of two loop cycles.
Ack Loop Template
Dynamic Worker List is created from emails of users defined in Field Workers sources.
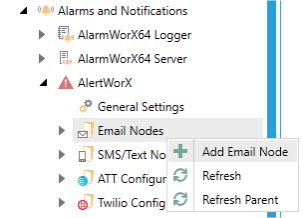
This example uses email as the method to notify field workers. For this, you must first configure a new email node in AlertWorX.
Add Email Node
For detailed instructions on creating an email node, please see the AlertWorX product help or the application note, AlertWorX - Alert Notification for Email and SMS
.
If you wish to use SMS messaging, rather than email, then see the application note, CFSWorX – SMS Configuration.
A workflow connects a template with trigger conditions. This section will describe how to create an example CFSWorX workflow.
Open Workbench.
Go to Connected Field Worker > Workflows.
Add a new configuration to the Workflows folder.
Give the configuration a name.
Go to the Configuration Settings tab.
Enable Active Configuration.
Go to the Alarm Settings tab.
The Alarm Subscription list defines the alarm sources for the workflows in this configuration. It should already contain a subscription to the local alarm server. This tab can be used to change or add more alarm sources and modify the alarm fields that CFSWorX subscribes to.
Alarm Subscription List

Apply the changes.
Add a workflow to the configuration.
Give the workflow a name.
Go to the Workflow Settings tab.
In the Workflow Template section, set Selected Template to Example Template.
In the General Settings header, select Click to configure the alarm filter.
Use the Configure Alarm Filter dialog to specify the particular alarm or alarms that will trigger this workflow. If no filter is configured, then any alarms that come in via the configuration's alarm subscription will trigger this workflow.
When finished, select OK.
Apply the changes.
Open Workbench.
Select Connected Field Worker or one of its children.
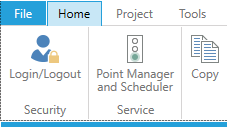
In the Home menu, make sure the Point Manager and Scheduler stoplight is green. If it is not green, select the stoplight button to start it.
Point Manager and Scheduler Stoplight
Select Alarms and Notifications > AlarmWorX64 Server.
In the Home menu, make sure the Alarm Server stoplight is green. If it is not green, select the stoplight button to start it.
If you added a filter to your workflow, trigger an alarm that matches that filter.
The first worker in the fixed worker list of your template should receive an email.
Open GraphWorX64.
Add an AlarmWorX64 Viewer.
Go into runtime.
Use the AlarmWorX64 Viewer to acknowledge the alarm that triggered the workflow. The field workers should stop receiving emails for this alarm.
Note: You can also log the system alarms and events using the AlarmWorX64 Logger. This will allow you to view the alarm state changes, including the field worker responses and alarm acknowledgements.
See Also: